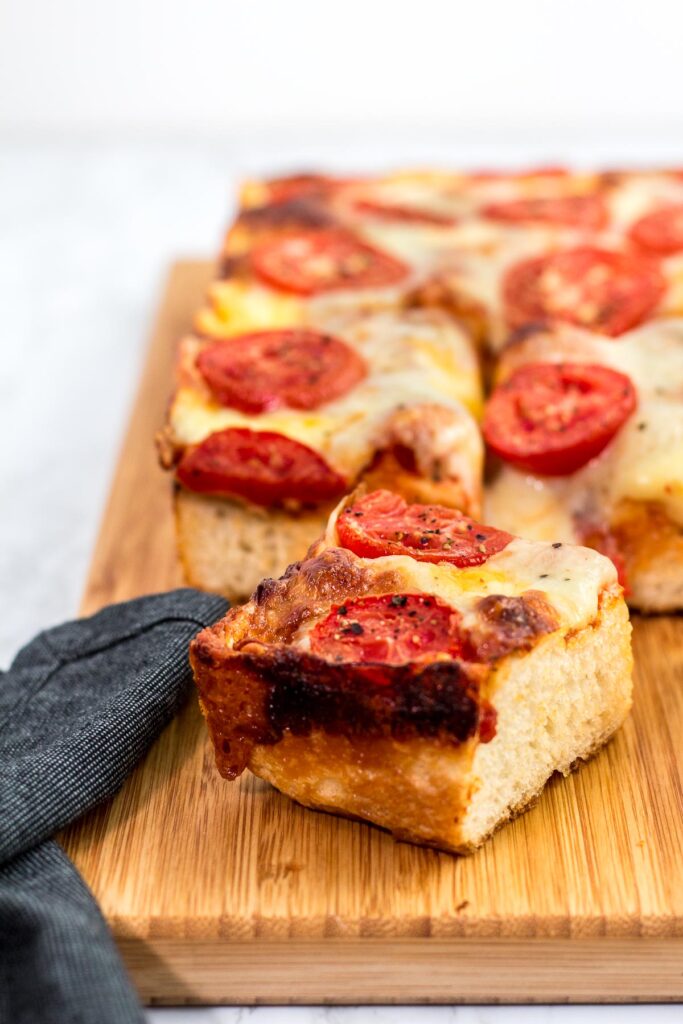
Vegetarian Detroit-style pizza with a thick, airy crust and crispy cheese edges. This easy homemade pan pizza recipe is rich, satisfying, and perfect for a cozy pizza night at home.
Recipe note: The recipe itself remains the same. This post was updated to clarify the steps and share additional tips for more consistent results at home.
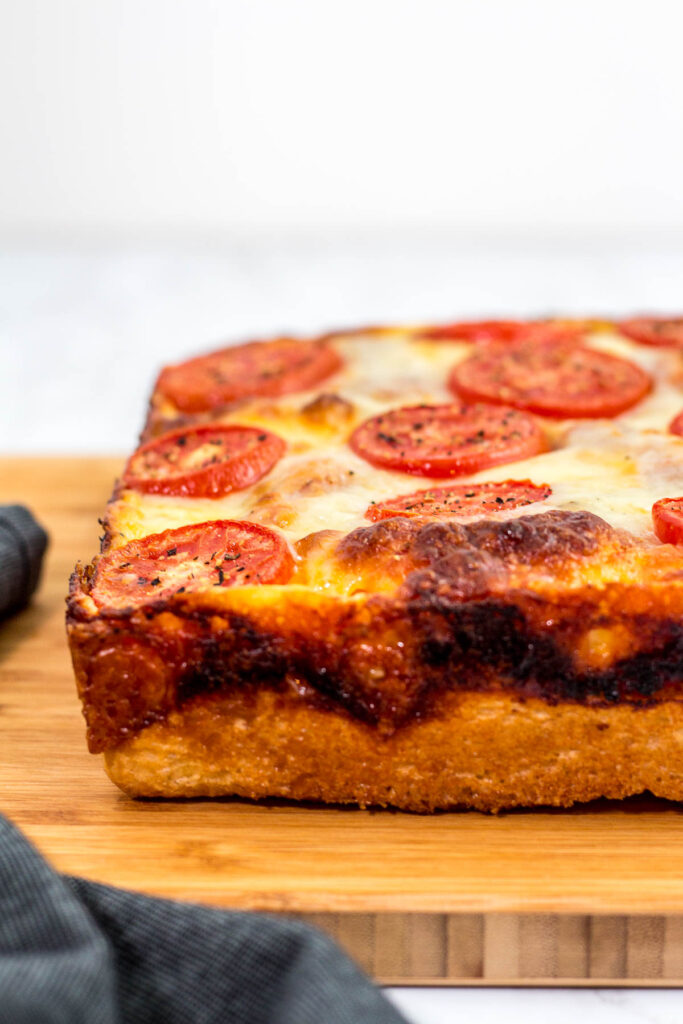
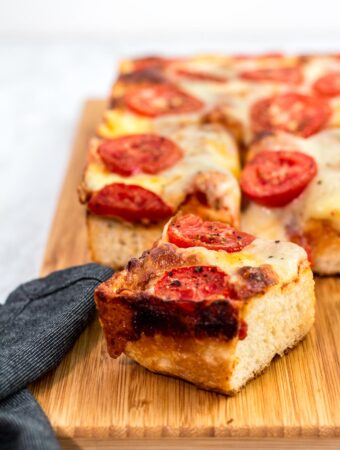
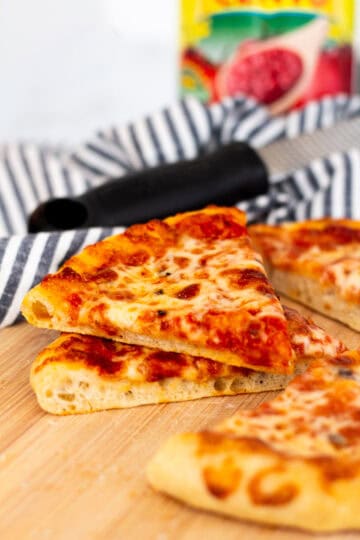
Vegetarian Detroit-style pizza features a thick, airy crust with a deeply crispy, cheesy edge (known as frico) baked right into the pan. This easy homemade version shows you how to make Detroit-style pan pizza at home using simple ingredients, a generously oiled pan, and melty cheese for rich, satisfying flavor in every bite.
Why You’ll Love This Recipe
- Crispy, cheesy edges: The generously oiled pan and melty cheese create the signature golden, lacy frico crust Detroit-style pizza is known for.
- Thick and airy crust: The dough bakes up soft and fluffy on the inside while staying crisp around the edges.
- Easy, foolproof method: No special equipment or advanced techniques needed. This pan pizza is approachable and reliable at home.
- Satisfying without meat: Cheese-forward flavor and texture make this vegetarian pizza just as hearty and comforting.
Ingredients You’ll Need
For the Dough
- Lukewarm water: Activates the yeast and helps create a soft, airy crumb.
- Sugar: Feeds the yeast and jumpstarts fermentation.
- Active dry yeast: Gives the dough its lift and light texture (You can also use instant yeast if that’s what you have on hand).
- All-purpose flour: Creates a sturdy but tender crust that holds up well in the pan (for a slightly chewier crust, bread flour works well too).
- Salt: Adds flavor and balances the richness of the cheese.
- Olive oil: Essential for a crisp, golden bottom and edges.
For the Pizza
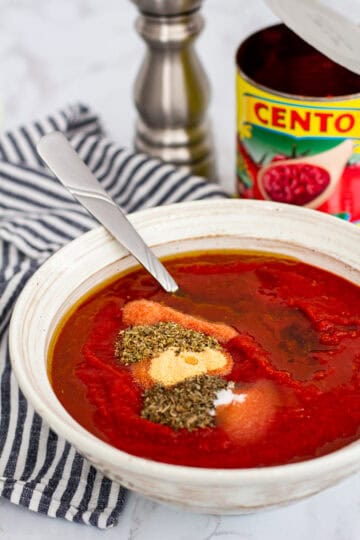
- Pizza sauce: Use your favorite jarred or homemade sauce for bold tomato flavor.
- Cubed cheese: Helps create the signature chewy, crispy edges along the pan (Wisconsin brick cheese is traditional, but Colby Jack, Monterey Jack, or mild cheddar are great substitutes).
- Shredded mozzarella: Melts evenly and adds classic pizza stretch.
- Roma tomatoes: Lower-moisture tomatoes that add freshness without making the pizza soggy.
- Black pepper: Simple seasoning that enhances the overall flavor.
How to Make It

- Make the dough:
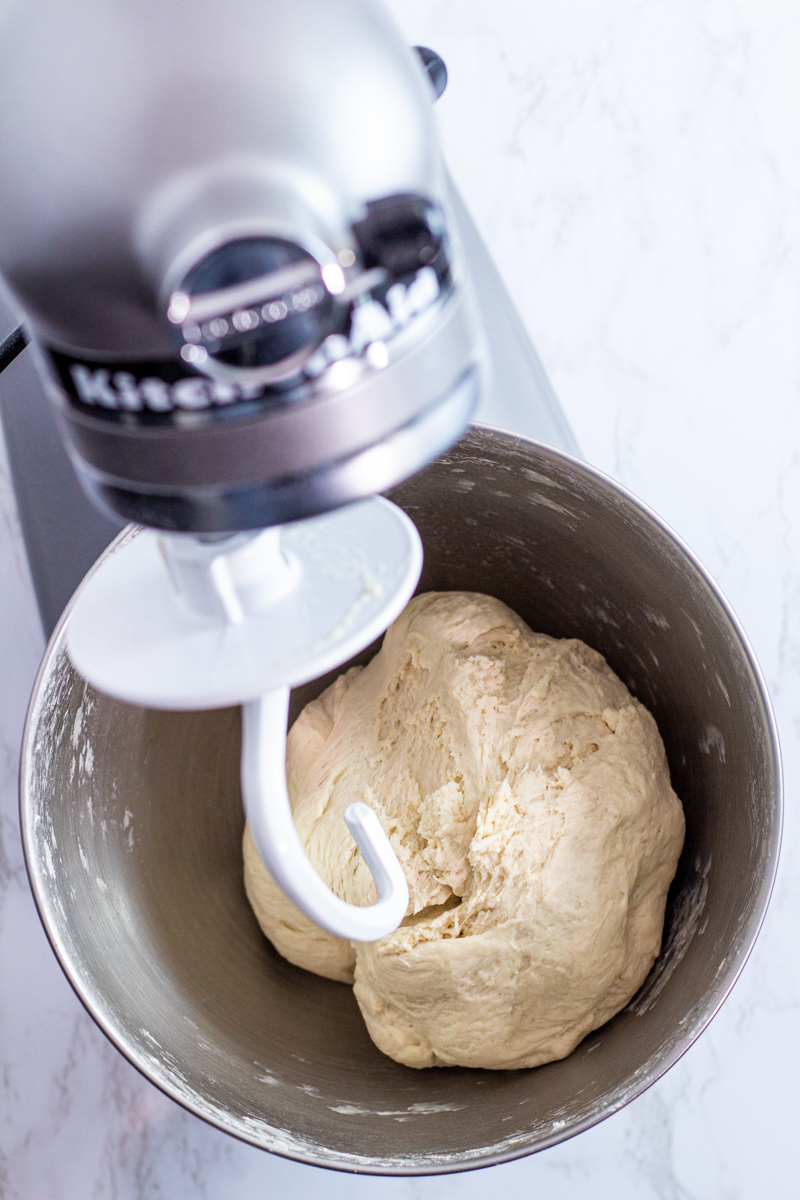
Dissolve the sugar in lukewarm water, add the yeast, and let it bloom until foamy. Mix with the flour and salt, then knead until a smooth dough forms.
If using instant yeast, mix it directly with the dry ingredients. - Oil the pan and rise the dough:
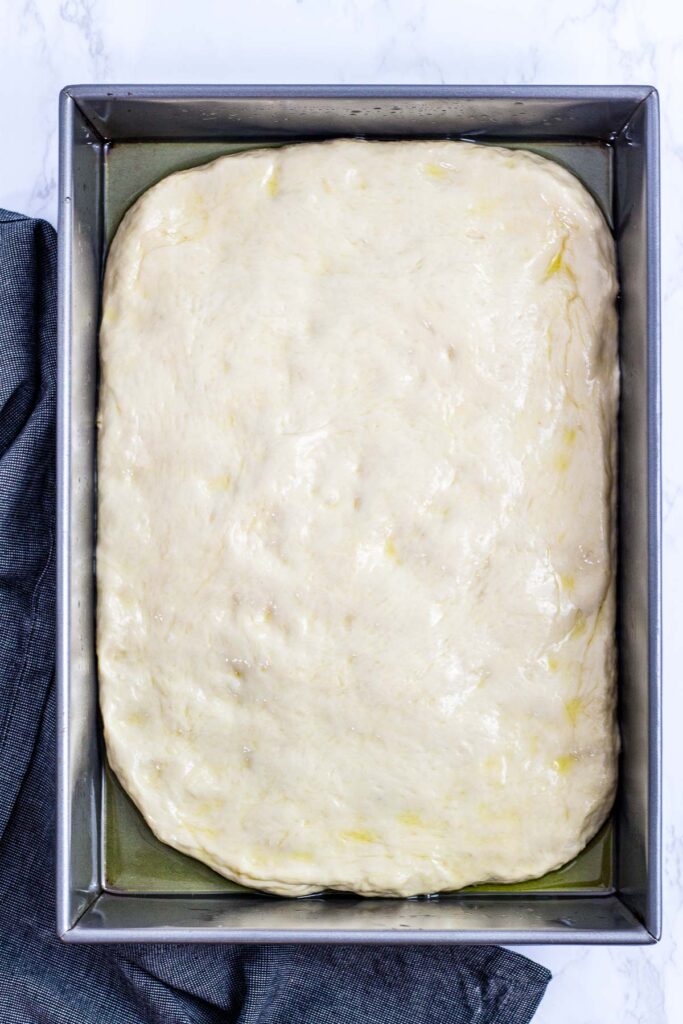
Generously coat a non-stick metal pan with olive oil, including the corners. Place the dough in the pan, flip to coat with oil, and gently press it out as much as it allows. (If the dough keeps shrinking back, let it rest for 10 minutes to relax the gluten, then try again). Cover and let it rise until it naturally fills the pan. - Preheat the oven:
Heat the oven so the crust starts crisping as soon as it goes in. - Sauce the dough:
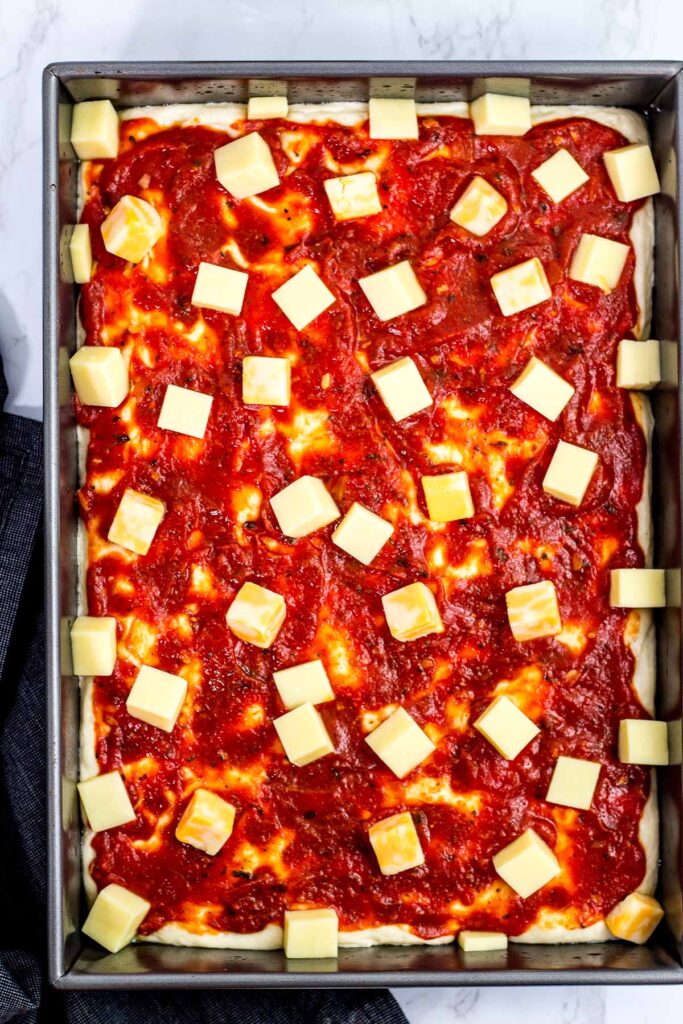
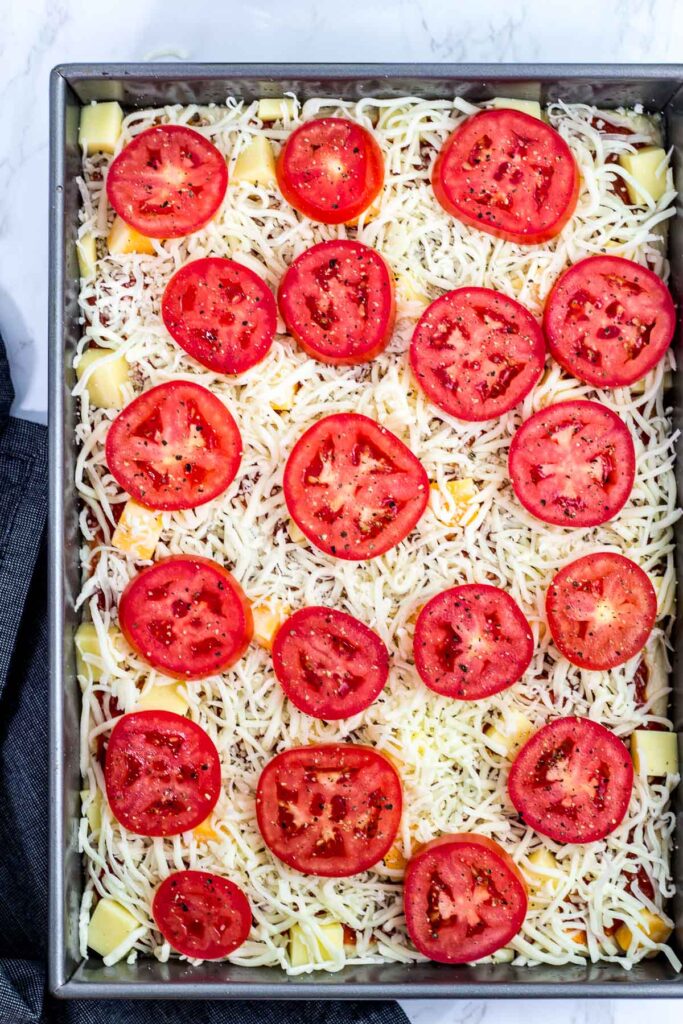
Spread a thin, even layer of pizza sauce over the risen dough, being careful not to deflate it. - Add the cheese (key step):
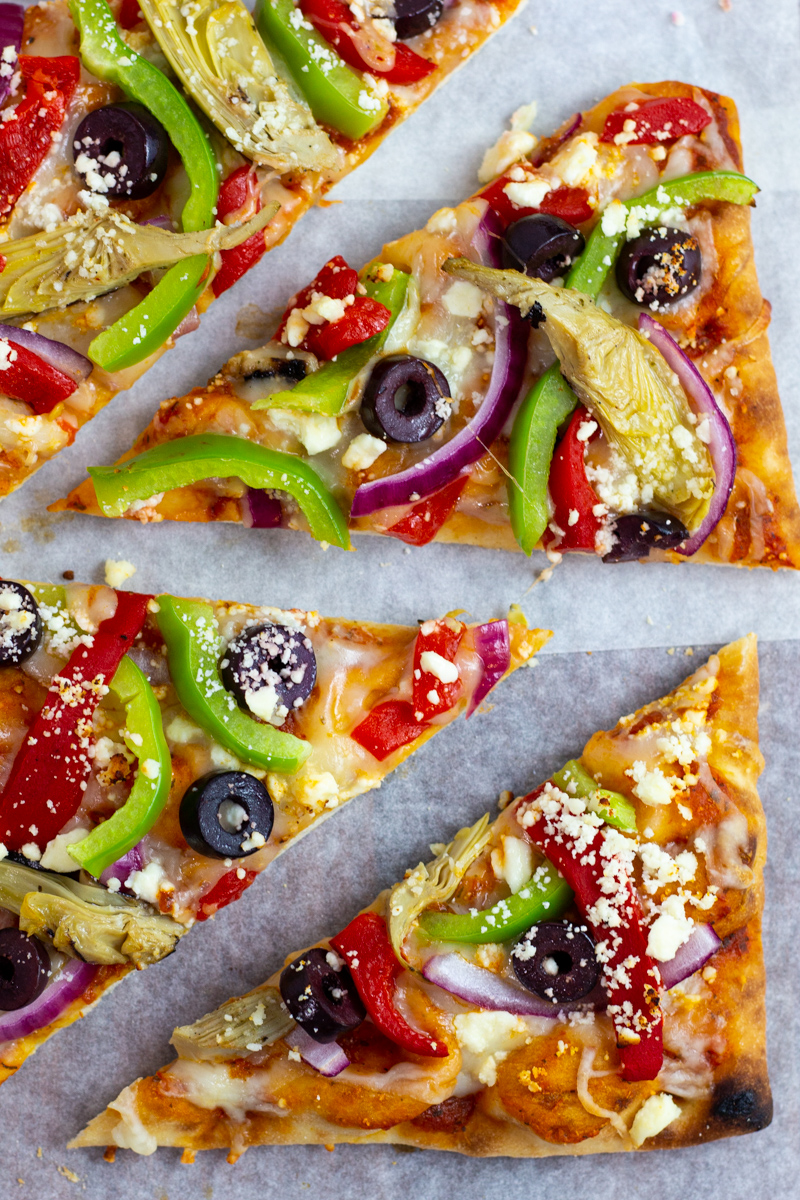
Scatter the cubed cheese and shredded mozzarella evenly, making sure some cheese reaches the edges of the pan to create the signature crispy, cheesy crust. - Top and bake:
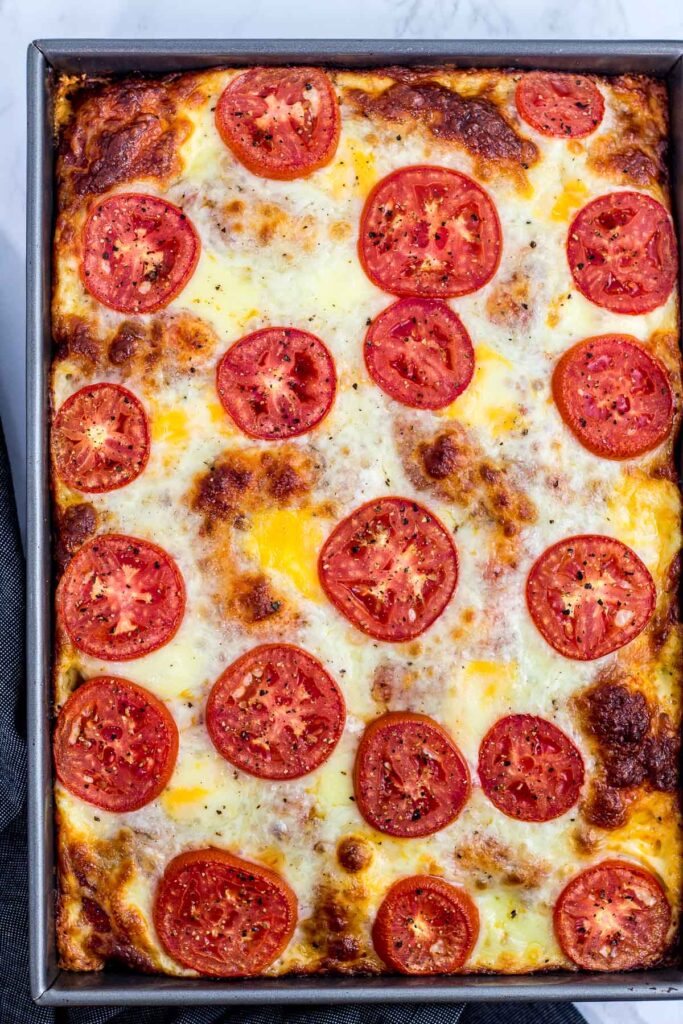
Add the sliced Roma tomatoes and a sprinkle of black pepper. Bake until the cheese is bubbly and the edges are deeply golden and lacy. - Cool and release:
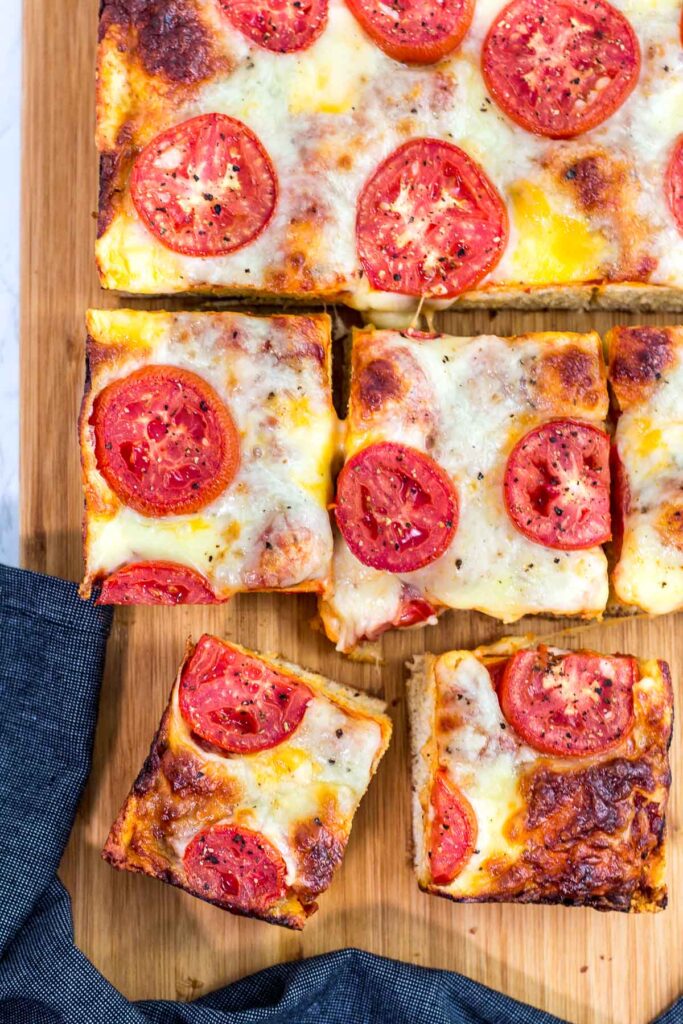
Let the pizza rest briefly, then loosen the edges with a spatula and slide it out of the pan before slicing.

Tips for Making Detroit-Style Pizza at Home
- Use a metal pan if possible: A non-stick metal pan or Detroit-style pan works best for creating crispy edges. Glass or ceramic pans won’t brown the cheese the same way.
- Oil the pan generously: Don’t be shy with the oil. It prevents sticking and helps the bottom and edges fry slightly as the pizza bakes.
- Push cheese to the edges: Make sure some of the cubed cheese touches the sides of the pan. As it bakes, the cheese melts and caramelizes against the pan, creating a crispy, lacy cheese edge known as frico.
- Keep the sauce light: A thin, even layer of sauce is enough. Too much sauce can weigh down the dough and add excess moisture.
- Feel free to add your favorite toppings: When using higher-moisture toppings, slice them thin or cook them briefly first so excess moisture can cook off during baking.
- Let the pizza rest before removing: Give the pizza a few minutes after baking so the cheese sets slightly, then loosen the edges and slide it out easily.
Questions You Might Have
Yes. Many traditional Detroit-style pizzas add the sauce on top of the cheese instead of underneath. In this recipe, the sauce goes on before baking for more even coverage, but you can add it on top if you prefer that classic look.
Yes. The dough can be made ahead and refrigerated for up to 2 days. Let it come to room temperature before pressing it into the pan so it’s easier to stretch.
Reheat leftover pizza in a 350°F oven for about 8 to 10 minutes, until heated through and the edges are crisp again. You can also reheat it in an air fryer at 350°F for 3 to 5 minutes. Avoid the microwave if possible, as it tends to soften the crust.
This vegetarian Detroit-style pizza is rich, comforting, and perfect for a cozy pizza night at home. If you’re in the mood for another homemade pizza, check out my pizza dough recipes using either the stand mixer method or the by-hand method for more traditional styles. For something a little fresher and lighter, you might also enjoy my Mushroom Spinach White Pizza or Mediterranean flatbread.
Vegetarian Detroit-style Pizza
Vegetarian Detroit-style pizza with a soft, airy crust and crispy cheese edges. An easy homemade pan pizza perfect for a cozy pizza night.
- Prep Time: 2 hours
- Cook Time: 20 minutes
- Total Time: 2 hours 20 minutes
- Yield: Serves 6
- Category: Main course
- Method: Bake
- Cuisine: American
- Diet: Vegetarian
Ingredients
For the Dough
-
1⅓ cups lukewarm water
-
2 teaspoons sugar
-
1 packet active dry yeast (about 2 teaspoons)
-
3 cups all-purpose flour
-
1 teaspoon salt
-
3–4 tablespoons olive oil
For the Pizza
-
1½ cups pizza sauce
-
6 ounces cubed cheese (Colby Jack, Monterey Jack, or mild cheddar work well)
-
1 cup shredded mozzarella cheese
-
3 medium Roma tomatoes, thinly sliced
-
Black pepper, to taste
Instructions
-
Make the dough:
Dissolve the sugar in lukewarm water, add the yeast, and let it bloom until foamy, about 10 minutes. Mix with the flour and salt, then knead until a smooth dough forms.
(If using instant yeast, mix it directly with the dry ingredients.) -
Prepare the pan:
Add 3–4 tablespoons of olive oil to a 9×13-inch non-stick metal pan, making sure to coat the bottom, sides, and corners well. -
Rise the dough:
Place the dough in the pan, flipping it once or twice so it’s fully coated with oil. Gently press it out as much as it allows. If the dough keeps shrinking back, let it rest for 10 minutes to relax the gluten, then try again. Cover loosely and let it rise until it fills the pan, about 2 hours. -
Preheat the oven:
Preheat the oven to 450–475°F. -
Sauce the dough:
If the dough has risen unevenly, gently press it with your fingertips to even it out, being careful not to deflate it. Spread the pizza sauce evenly over the dough. -
Add the cheese:
Sprinkle the cubed cheese and shredded mozzarella evenly over the pizza, making sure some cheese reaches the edges of the pan to create crispy, cheesy edges. -
Top and bake:
Arrange the sliced Roma tomatoes on top and sprinkle lightly with black pepper. Bake for 17–20 minutes, until the cheese is melted and the edges are deeply golden. -
Cool and serve:
Let the pizza cool for a few minutes. Loosen the edges with a spatula and slide it out of the pan. Slice and serve.
Notes
- This recipe has not changed. The post was updated to clarify the steps and share additional tips for more consistent results at home.
-
Generously oiling the pan is essential for creating the crispy bottom and signature cheesy edges.
-
For the classic Detroit-style look, you can add the sauce on top of the cheese instead of underneath.
-
When using higher-moisture toppings, slice them thin or cook them briefly first so excess moisture can cook off during baking.
-
For crispier leftovers, reheat the pizza in a 350°F oven for 8–10 minutes or in an air fryer at 350°F for 3–5 minutes. Avoid the microwave if possible.
MO in AR says
Can this recipe be frozen? Looking for meals I can freeze for my kids and use during my postpartum time.
George says
Yes, you can easily freeze the dough and thaw in the fridge. You can also make the pizza sauce in advance and freeze them as well. I would prep everything and keep in the fridge and assemble the pizza while the oven is preheating! Hope this helps!
Pete says
Why not use a glass baking dish? That way you can monitor how the bottom crust is browning.
George says
Although it's easier to see the crust when making it in the glass baking dish, using a metal dish ensure you will get the crispy edges from the cheese.
Sarah Conley says
Love this recipe!! I’ll be doubling it this time and wondered if I could use a glass 9x13 pan? I only have one metal pan. Thanks!
George says
Hi Sarah, I'm so glad you like the recipe!
I made this in a glass pan before and the crust didn't come out as crispy as the one that I baked in the metal pan. If you don't mind the difference, you can use the glass pan. I would add a little more oil and a longer baking time (just a couple more minutes) to compensate. Hope this helps!
Jamie says
Wondering if I can make this dough and all the toppings assembled and let it sit until ready to bake it. Thinking about for football this weekend but wanting to watch the games so if I could have it ready and pop into the oven right before half time would be great. Your thoughts?
George says
Hi Jamie,
I would make the dough and rise overnight in the fridge. But I will prepare the sauce and topping separately and assemble right before you are ready to make the pizza. I'm afraid that the toppings and the sauce will weigh down the dough and deflate the dough. If you already tried the method you mentioned, let me know how it turned out!
Sue says
Hello. Making tonight but don’t have two hours. Will it be similar if only rising a hour?
George says
Hi Sue, I would turn on my oven to the lowest setting (150 to 200F) and once it reach its temperature, turn off the oven right away and put your dough in the oven. I sometimes use this method during winter time. Hope this helps!
Judy says
Have you ever made the dough and then froze it before rising?
George says
Hi Judy,
You can freeze the dough before or after it rises, but make sure to rise the dough when defrosted then form into a crust. I'd recommend you make a note on a freezer bag that you placed the dough so that you can remember to rise the dough. Hope this helps!
Francine D’Urso says
I wish there was a way to send you my photo of my pizza it was delicious ….. thank you thank you . your recipe is spot on ❣️❣️❣️
George says
Yay!! I'm so happy to hear that, Francine.
This pizza can be easily customized. You can really play with different toppings and cheese. I hope this is a recipe you can come back to from time to time.
Thank you so much for your review 🙂
Francine D’Urso says
I’am so excited about this . i just made my dough and sauce . waiting the two hours i will let you know how it turns out. thank you for sharing 😍
Victoria says
Am I able to use my bread maker on the dough setting for this?
George says
Hi Victoria, thanks so much for your question! I actually haven’t tested this recipe with a bread maker, so I can’t say for sure how it would turn out. The dough is designed to be made by hand and only needs a simple knead until it comes together, followed by a rise in the pan. If you do try it in a bread maker, I’d love to hear how it goes!
Sandra says
Just made the crust, and it was excellent. I added 2 tsp garlic powder to the crust. Definitely will make it again.
George says
Hi Sandra, Thank you so much for your review! Garlic powder is such a great idea! I'm so happy you enjoy the recipe!
Jen says
Sadly, this recipe fell short for me. Big Detroit style pizza fan here, so I’ve even got the right pan. My edges and bottom looked nice and crisp with some lovely carmelization. Toppings were good. The issue I had was with the crust. It was fluffy and thick, but was lacking the rich flavor and slight chewiness of signature Detroit style pizza. Basically, we felt as if we were eating pizza made on fresh and fluffy homemade bread. After taking a second look at your pictures, I can see your crust had a similar texture and crumb structure. It wasn’t bad, but it wasn’t Detroit style pizza to us. When I think of Detroit style pizza, I think of bread meets focaccia flavor and texture. Wondering if a different type of flour or longer rise would help?
George says
Hi Jen,
I think using a flour with the high gluten content such as bread flour can help. Also, if you'd like more of a strong structure and chewy texture, you can use "stretch and fold method" after the initial rise of the dough and repeat for a couple more time and let it rise overnight in the fridge. Hope this helps!
Kit says
I’ve made this pizza several times and it is amazing! One question, can you leave the dough rising for longer than 2 hours?
George says
Hi Kit, yes you can let the dough rise for more than 2 hours. I have done so for up to 3 hours. If you are planning on letting the dough rise for longer, you can simply place the dough in the fridge for up to 1 day (this will allow the dough to rise slowly). I hope this helps! I'm delighted you liked the recipe!
Sandra Yager says
Love this pizza crust. Like others, I, too prefer thin crust. This crust isn't like a ton sitting in your stomach. I use my own recipe for the sauce so the crust is all I can comment on.
George says
Hi Sandra,
I'm glad you like the crust. Yes, although it is a "thick-crust pizza", it isn't as heavy as it looks 🙂
Thank you so much for your review!
Lester Mosko says
Waiting to hear from other pizza lovers.
Lester Mosko says
I have always been a thin type crust. Now that I have tried the Detroit style I am so excited about the crust. I love the burnt crust I am trying all the combinations to make it my taste. A new beginning for a former New Haven Pie known as. the worlds best pie Thanks for the opportunity to share with other Pizza loving chow hounds.
George says
Hello Lester, I'm also a thin crust pizza fan myself! Detroit-style pizza is certainly heavier but the doughy and cheesy goodness of this pizza is something that I like to indulge myself with once in a while. Thank you so much for your kind review! Happy to hear that you like the recipe!
Traci says
Can I use 00 pizza flour with this?
George says
Hi Traci, I personally never used 00 flour to make this pizza. But according to what I've found online, you can use 00 flour instead of all-purpose flour. However, I would reserve the 00 flour to make pasta or regular pizza crust rather than Detroit-style pizza. I like the chewier texture of the pizza crust/bread in this recipe and all-purpose flour would be a better choice. Hope this helps!
Lis says
This recipe was AMAZING!! I doubled the recipe so that my family of 5 could eat two meals out of it (dinner and lunch the next day) and it was so delicious. We all loved it, even my pickiest eater. This recipe is a keeper!
George says
Thank you so much for your kind words and review, Lis!
I'm so glad you and your family like the recipe!