Maki roll recipe for two. Learn how to make thin sushi rolls (hosomaki) at home with tuna, salmon, or cucumber in this beginner-friendly guide.
Learn how to make classic thin sushi rolls at home with tuna, salmon, or cucumber. This beginner-friendly maki roll recipe walks you through each step so you can roll confidently, even if it’s your first time making sushi! This recipe makes six thin rolls, just enough for two people to enjoy as a light meal or sushi night at home.
Jump to:
- What is Maki, Hosomaki, and Other Types of Maki Rolls?
- Why This Recipe Works
- Ingredients & Tools
- How to Make Sushi Rice
- Step-by-Step: How to Make Thin Maki Rolls (Hosomaki)
- Tips for Perfect Maki Roll
- Filling Ideas & Variations
- Common Questions About Maki Roll
- Maki Roll Recipe – Beginner-Friendly Thin Sushi Rolls
What is Maki, Hosomaki, and Other Types of Maki Rolls?
Maki is sushi rice with filling(s), rolled up in seaweed and sliced into pieces. There are a few common types of maki rolls:
- Hosomaki: Thin roll with just one filling, like cucumber, tuna, or avocado.
- Futomaki: Thick roll with several fillings.
- Uramaki: Inside-out roll with rice on the outside.
- Temaki: Hand roll shaped like a cone.
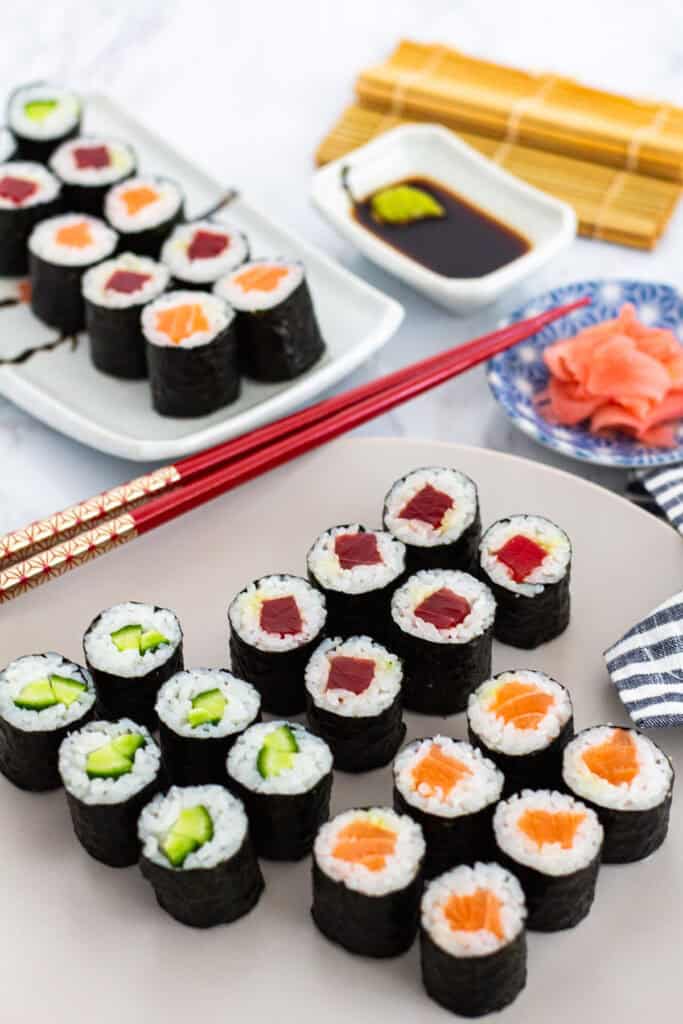
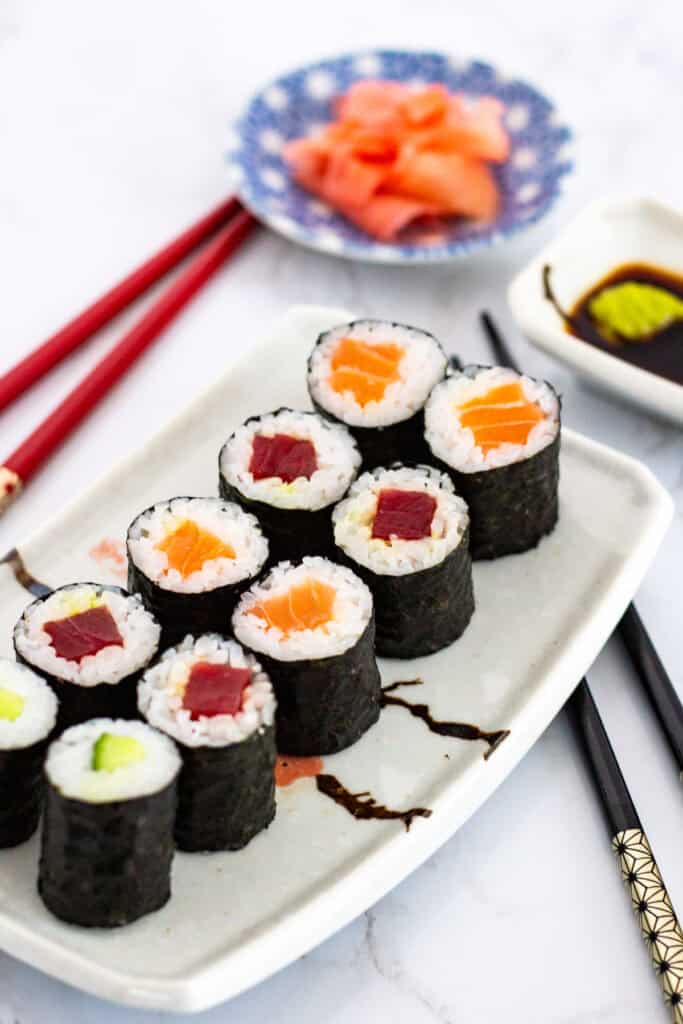
In this recipe, we’re making three simple hosomaki rolls: one with cucumber, one with tuna, and one with salmon. These classic thin rolls are easy to customize and perfect for beginners.
Why This Recipe Works
- Beginner-Friendly: With just one filling, hosomaki is simple to assemble and easy to roll. It's perfect for first-timers!
- A True Classic: These clean, simple rolls are a restaurant staple! And a great way to master the basics before trying more advanced styles.
- Fresh & Customizable: Fresh-tasting and versatile, hosomaki works beautifully with classics like cucumber, tuna, salmon, or your own favorite fillings.
Homemade sushi doesn’t have to be intimidating. This recipe proves it can be fun, approachable, and delicious.
Ingredients & Tools
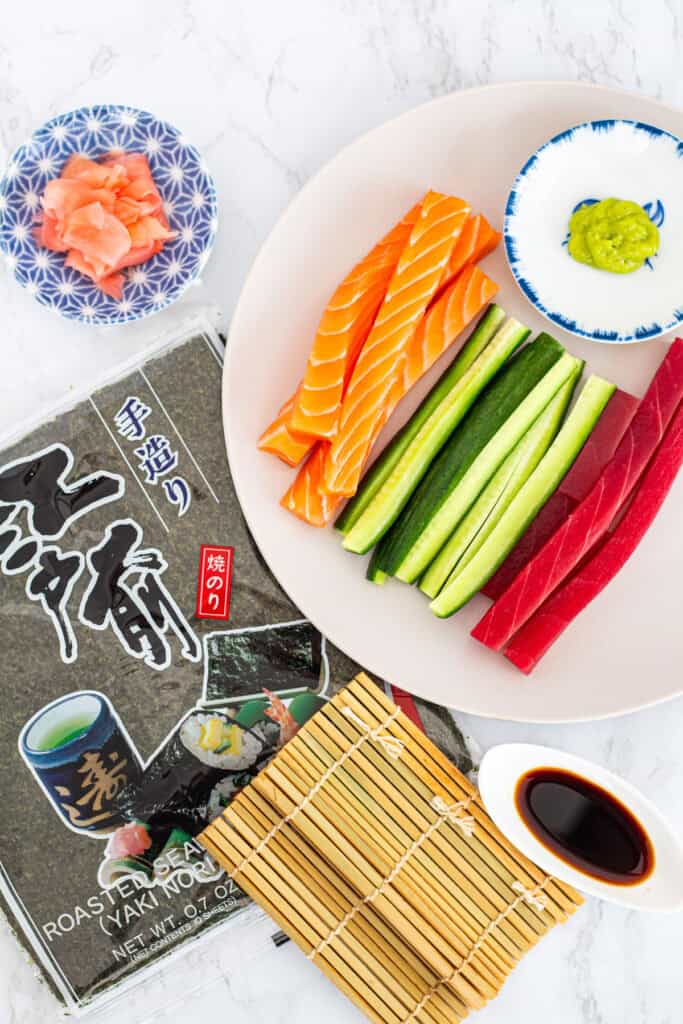
Ingredients
- Sushi rice – seasoned and ready to use (see my Sushi Rice Recipe for step-by-step instructions)
- Nori sheets (half-size) – you can buy pre-cut half sheets at the store, or simply fold a full sheet in half and tear it by hand
- Fillings:
- Cucumber - I like to use either English cucumber or Persian cucumber.
- Sashimi-grade tuna (optional, sliced into thin strips)
- Sashimi-grade salmon (optional, sliced into thin strips)
- Optional garnishes: pickled ginger, wasabi, soy sauce
Tools
- Bamboo sushi rolling mat
- Sharp knife (wet with water to prevent sticking)
- Small bowl of water or disposable plastic gloves (gloves help prevent rice from sticking and are often easier for beginners)
- Cutting board
These few tools and ingredients are all you need to make three classic hosomaki rolls: one with cucumber, one with tuna, and one with salmon.
How to Make Sushi Rice
Sushi rice should be soft, sticky, and lightly seasoned. Here’s my quick method:
- Rinse 1 cup of sushi rice several times in cold water until the water is mostly clear. Drain well.
- Cook in a rice cooker with an equal amount of water (1:1 ratio) on the white rice setting.
- While it cooks, mix 5 tablespoons rice vinegar, 2 tablespoons sugar, and 2 teaspoons kosher salt until dissolved.
- When the rice is done, drizzle the seasoning over it and gently fold. Don't mash the grains.
- Cover with a damp paper towel and let it cool slightly before using.
If you'd like my detailed post about how to make perfect sushi rice (rice cooker method), please see this post!
Step-by-Step: How to Make Thin Maki Rolls (Hosomaki)
Follow these easy steps to roll your own maki roll at home:
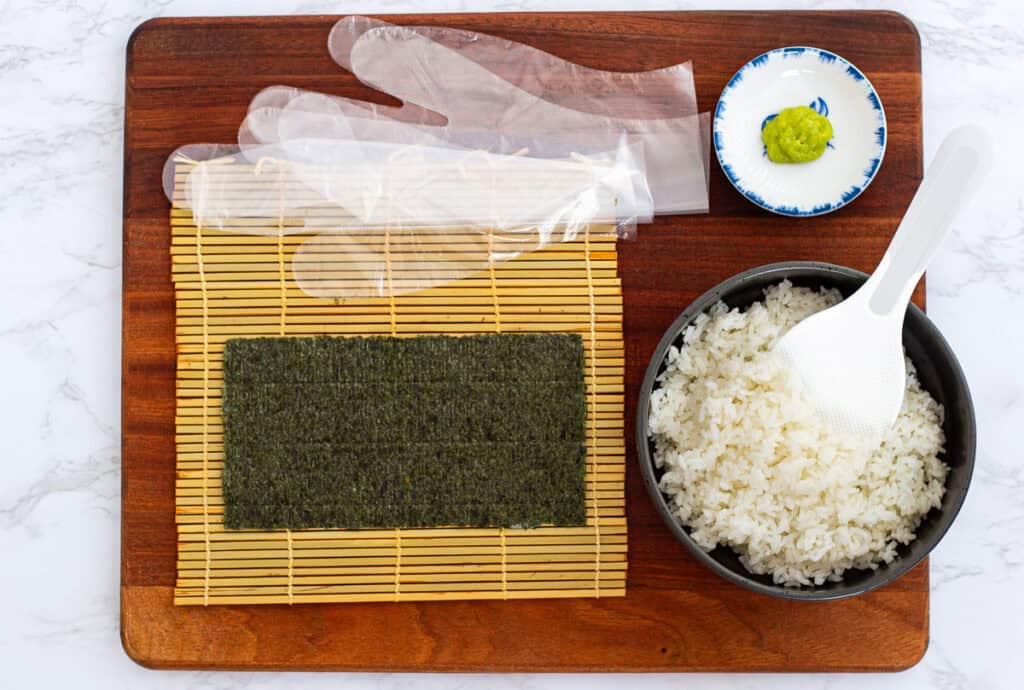
- Prepare your workspace - Place a bamboo sushi rolling mat on a clean surface. (Tip: You can find these much cheaper at an Asian grocery store than online.)
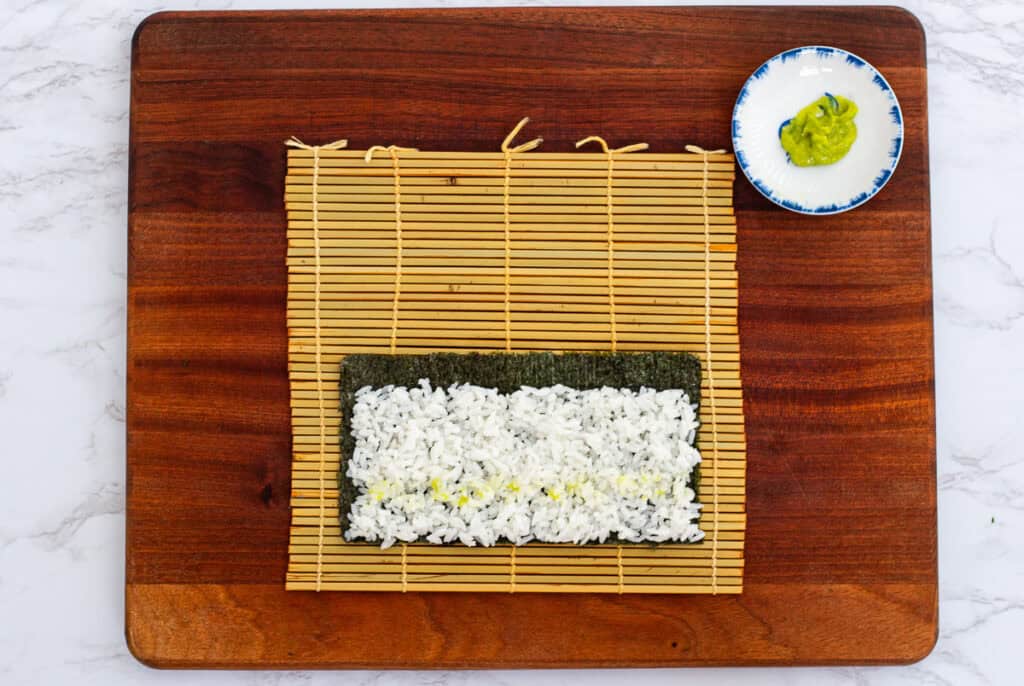
- Cut and place the nori - Fold a full sheet of nori in half, then tear or cut along the fold to make two half sheets. Place one half sheet shiny side down on the bamboo mat, with the longer edge closest to you.
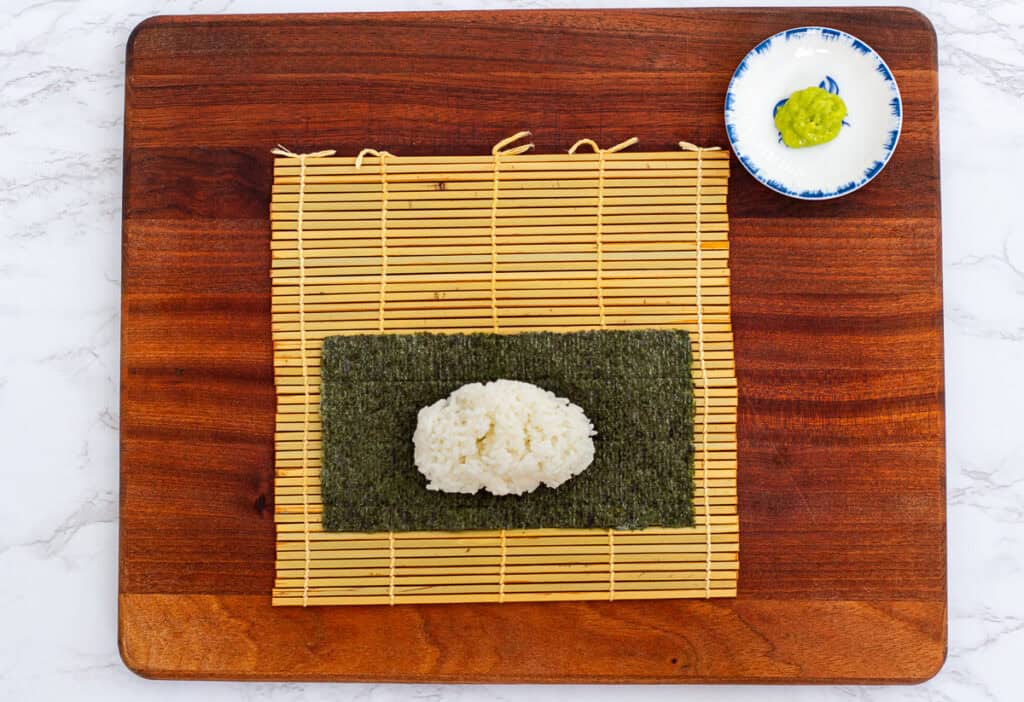
- Spread the rice - With wet hands or gloves, gently spread about ½ cup of seasoned sushi rice over the nori in a thin, even layer, leaving the top edge uncovered.
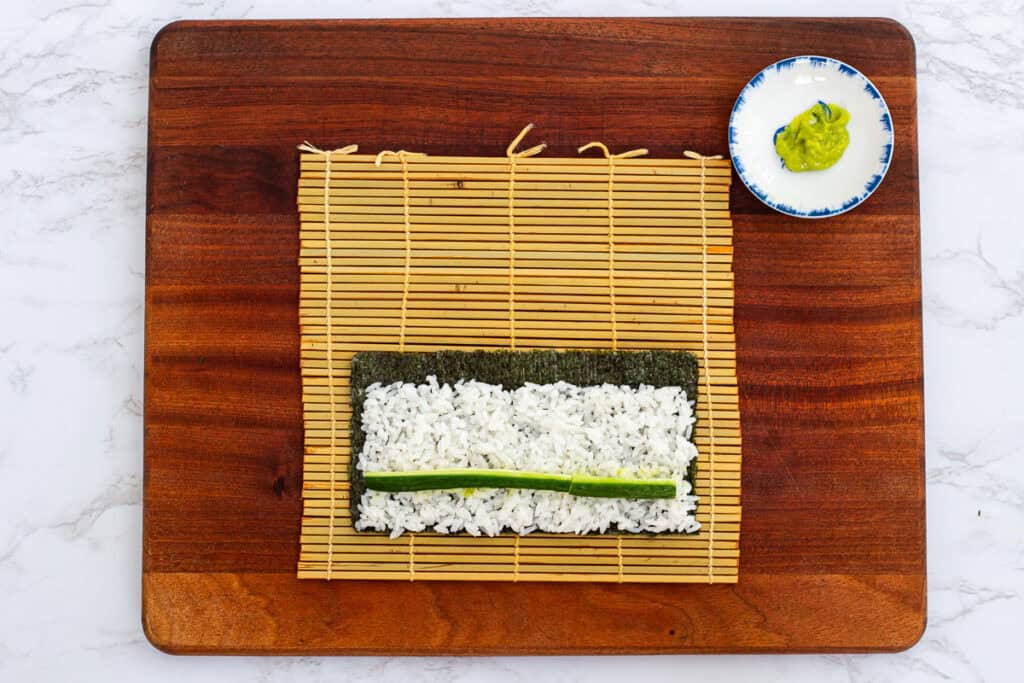
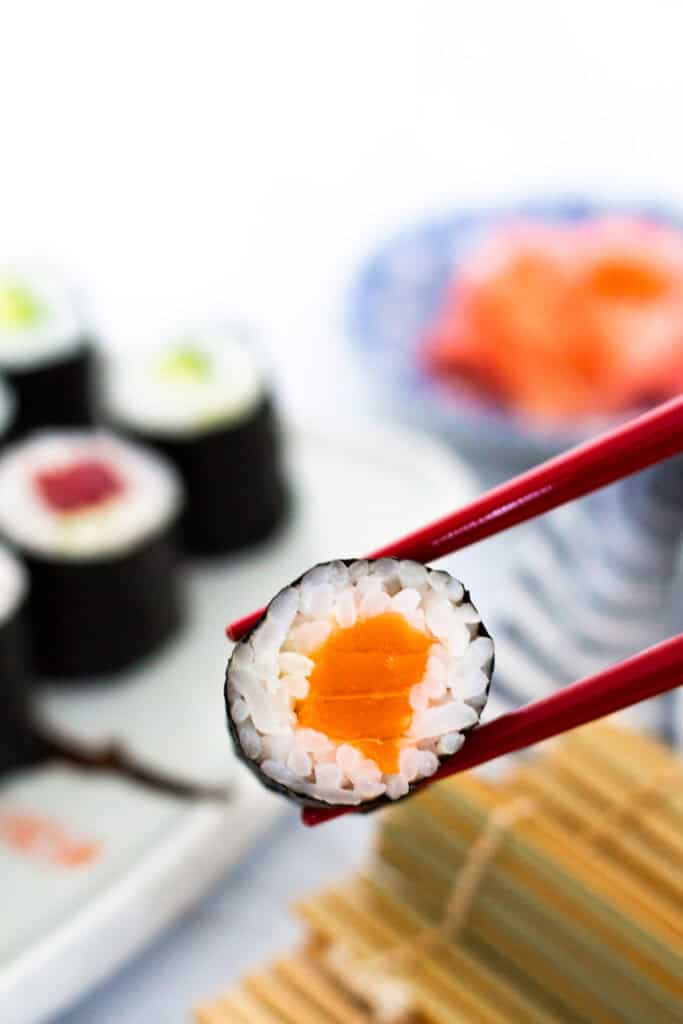
- Add the filling - Place your filling (cucumber, tuna, or salmon) in a straight line near the bottom edge of the rice. If you like, you can also spread a very thin layer of wasabi paste on the rice.
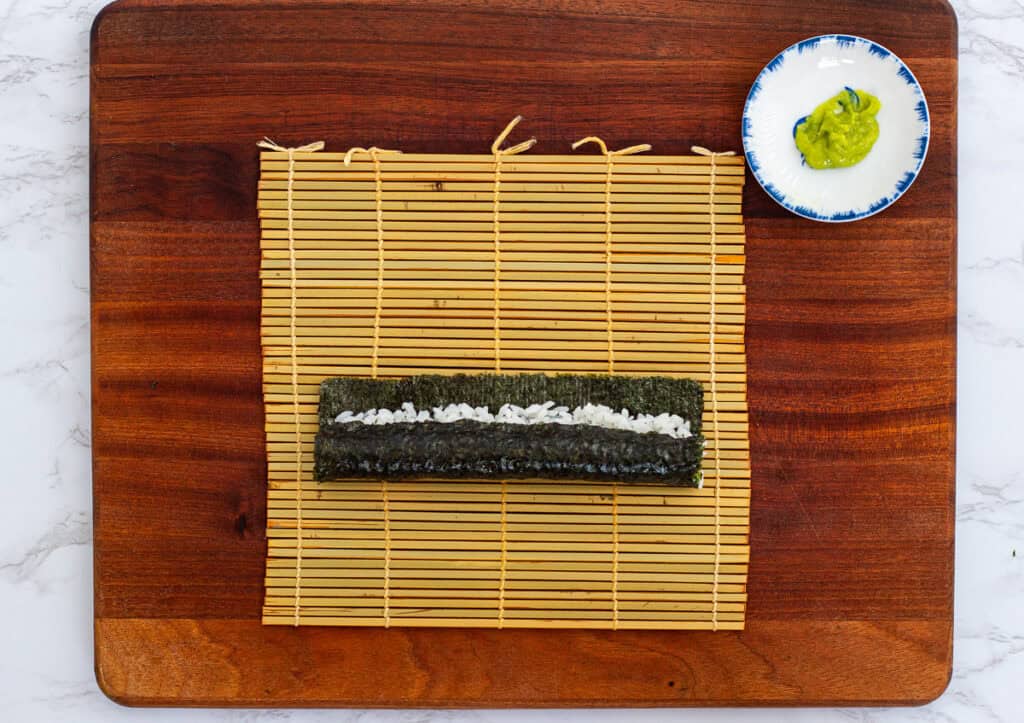
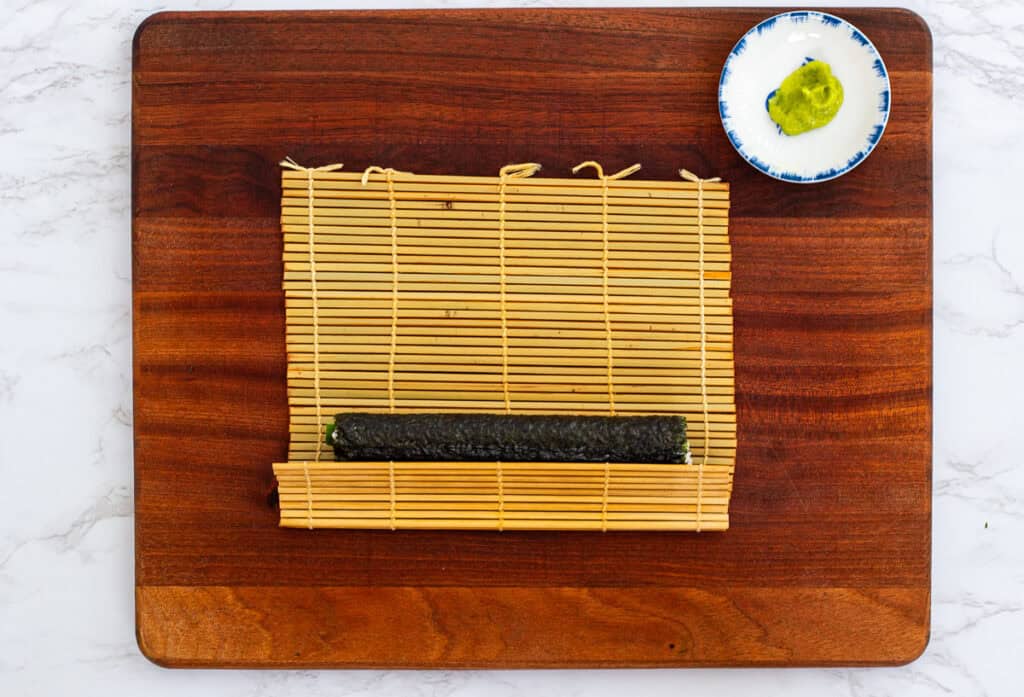
- Roll it up - Very lightly wet the uncovered edge of the nori — this helps seal the roll. Using your thumbs and index fingers, lift the bottom edge of the nori and rice and fold it over the filling. Keep it snug but don’t squeeze. Once the rice and nori cover the filling, slide the roll to the bottom of the mat and continue rolling until you reach the end.
- Shape the roll - Press gently to shape it into an even cylinder.
- Repeat - Place the finished roll seam-side down while you roll the rest.
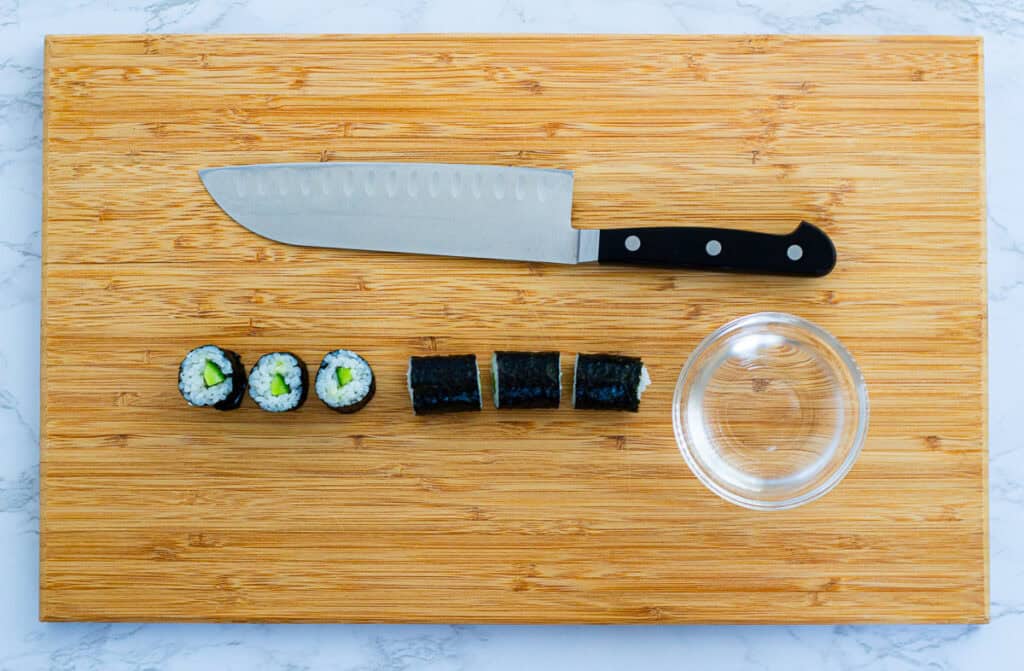
- Slice - With a wet knife, slice the roll using a gentle sawing motion—don’t press down, as that can squash the roll. For even pieces, first cut the roll in half, then cut each half into three equal pieces. Wipe the knife clean between cuts to keep the edges neat.
- Serve - Serve with soy sauce, pickled ginger, and/or wasabi.
Tips for Perfect Maki Roll
- Use the rough side of the nori. Place the rice on the rough side of the nori so the shiny side ends up on the outside. It looks more polished and professional. But if you accidentally flip it, no big deal - it’ll still taste great!
- Wear disposable gloves, or lightly dampen your hands to prevent sticking. Shake off excess water — too much will make the rice soggy.
- Don’t press the rice down. Gently spread the rice with your fingertips, keeping it light and even. Pressing too hard can make the rice gummy, mushy, or overly dense.
- Keep it snug, not tight. Roll the maki firmly enough to hold together, but not so tightly that it tears the nori. This is less of an issue with hosomaki since it’s just one filling, but learning to avoid over-tightening now will help when you make thicker futomaki rolls later.
- Wet the edge to seal. Lightly wetting the top edge of the nori helps close the roll neatly and keeps it from unrolling.
- Clean your knife between cuts. Wipe or dip your knife in water before each cut to keep the slices clean and even.
- Cut in halves, then thirds. To get more even pieces, cut the roll in half first, then cut each half into three equal pieces. This helps keep your slices uniform in size.
- Practice makes perfect. Don’t stress if your first rolls aren’t perfect — they’ll still taste amazing, and you’ll get better every time you roll.
Filling Ideas & Variations
One of the best things about hosomaki is how easy it is to customize. Here are some simple and classic filling ideas to try:
- Cucumber or Avocado: Both are crisp, fresh, and vegan/vegetarian-friendly!
- Salmon: Sashimi-grade salmon for a buttery, mild option.
- Crab Meat: A great choice if you don't want raw fish!
Once you get comfortable, you can combine one or two ingredients to make your rolls a little fancier. Classic examples include:
- Any fish with avocado or cucumber
- Salmon with cream cheese
- Crab meat with cucumber and avocado for a simple California roll
Common Questions About Maki Roll
Absolutely! There are plenty of delicious options that don’t require raw fish. Cucumber, avocado, and crab meat are all popular choices, and if you prefer cooked seafood, seasoned unagi (eel) or tempura shrimp are also excellent options. These fillings still give you that sushi experience without using raw fish.
A bamboo mat is a worthwhile investment. I bought mine at an Asian grocery store for around $3, and it’s much easier to use than alternatives. While some people recommend parchment paper or a kitchen towel in a pinch, I personally haven’t tried those methods and always recommend getting a proper mat.
Hosomaki is best eaten fresh. I recommend making only what you plan to eat within a couple of hours. The rice texture changes when refrigerated, so it’s better not to prepare it too far in advance.
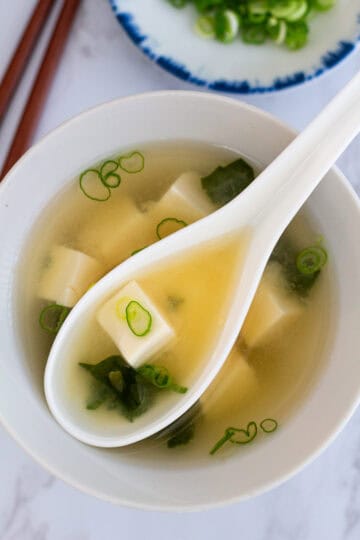
If I’m serving hosomaki as a meal, I usually prepare about 4–6 rolls total for my husband and me, along with a bowl of simple miso soup.
Sushi refers to seasoned rice with toppings or fillings in general. Maki is a type of sushi where the rice and filling are rolled in seaweed and sliced into pieces.
For this easy maki roll recipe, I recommend about ½ cup of rice, and a thin line of filling is just right for one hosomaki roll. Keeping the amount of light helps the roll stay tight and easy to slice.
I hope this step-by-step, easy maki roll recipe gives you the confidence to make hosomaki at home. This batch makes six thin rolls, perfect for two people to share as a light sushi night. For a more complete meal, serve it with my quick miso soup with dashi for something warm and comforting alongside the rolls.
If you are new to sushi, start with my Easy Sushi Rice Recipe. It is the foundation for every great roll. You can also browse my Japanese Pantry Essentials guide to stock your kitchen with the basics.
When you are ready to expand your sushi night, try my spicy tuna hand rolls or unagi (Japanese Eel) rolls for a simple but impressive spread. If you make this recipe, leave a comment below. I would love to hear how it turns out.
PrintMaki Roll Recipe – Beginner-Friendly Thin Sushi Rolls
This easy maki roll recipe makes six thin sushi rolls, just right for two. A simple, beginner-friendly guide to making classic hosomaki at home.
- Prep Time: 30 minutes
- Total Time: 30 minutes
- Yield: 6 thin rolls 1x
- Category: Appetizer, Main course
- Method: No cooking
- Cuisine: Japanese
Ingredients
-
3 cups prepared and seasoned sushi rice (see my Easy Sushi Rice Recipe for details)
-
1 Persian cucumber, cut into thin strips
-
2 oz sushi-grade salmon, cut into thin strips
-
2 oz sushi-grade tuna, cut into thin strips
-
3 full sheets of nori (seaweed), cut in half to make 6 half-sheets
-
Wasabi (optional)
-
Soy sauce, for serving
-
Pickled ginger, for serving
Instructions
-
Prep your station: Place a bamboo sushi mat on a clean surface. Have a small bowl of water nearby to dampen your hands if needed, or wear disposable gloves.
-
Place the nori: Lay a half sheet of nori, shiny side down, on the bamboo mat.
-
Add rice: With lightly damp hands or gloves, spread a thin, even layer of sushi rice over the nori, leaving about ½ inch (1 cm) of the top edge uncovered.
-
Add filling: Place a few thin strips of cucumber, salmon, or tuna horizontally across the center of the rice. Add a small dab of wasabi, if using.
-
Roll it up: Using your thumbs to lift the mat, roll the nori over the filling, keeping it tight but not squishing. When you reach the uncovered edge of nori, dab it lightly with water to help seal the roll. Gently press to shape into a neat cylinder.
-
Slice: With a sharp, damp knife, slice the roll in half, then cut each half into three even pieces, wiping the knife between cuts to keep it clean.
-
Serve: Arrange the pieces on a plate and serve with soy sauce, pickled ginger, and extra wasabi on the side.
Notes
- Don’t miss the step-by-step photos and pro tips above! They’ll help you roll like a pro, even if it’s your first time!
- Each roll makes about 6 bite-sized pieces. This recipe makes 2 cucumber rolls, 2 salmon rolls, and 2 tuna rolls - perfect for sharing as an appetizer or enjoying as a sushi dinner for two.
- Be sure to check out my Easy Sushi Rice post for all the details on making perfectly seasoned rice, and my Japanese Pantry Essentials post to stock your kitchen with everything you need.


Share your thoughts below!