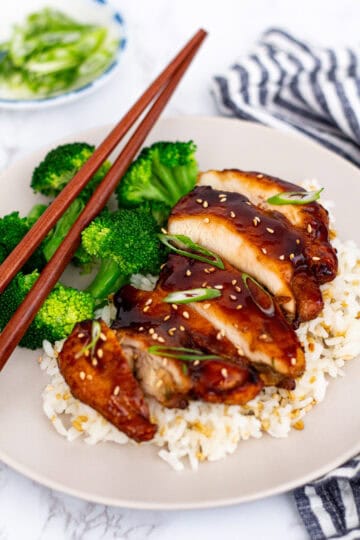
Homemade unagi roll with grilled eel, sushi rice, and nori. An easy, beginner-friendly recipe for an impressive sushi night for two.
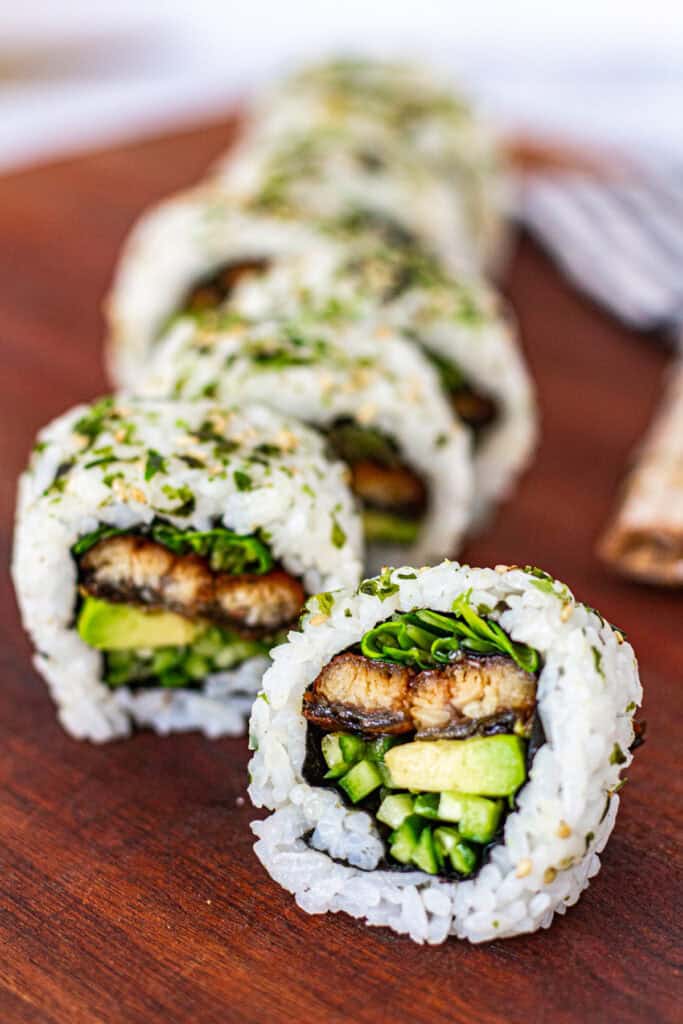
Unagi roll is a popular Japanese sushi roll made with grilled eel, seasoned sushi rice, and nori. This homemade unagi roll recipe focuses on an inside-out style roll with rice on the outside, highlighting the eel’s sweet, smoky flavor and its beautiful, restaurant-style presentation in a way that’s approachable for home cooks. With just two rolls in this recipe, it's perfect for a special sushi night for two at home.
Jump to:
Ingredients for Unagi Roll
- Seasoned sushi rice, cooled to room temperature
- Roasted nori (seaweed) sheets
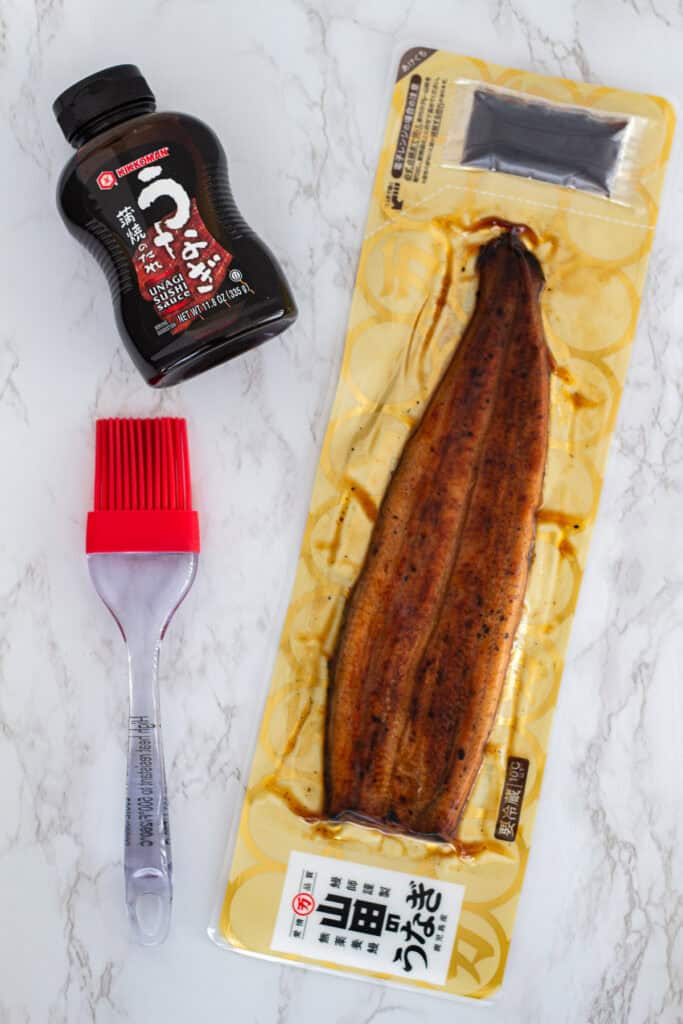
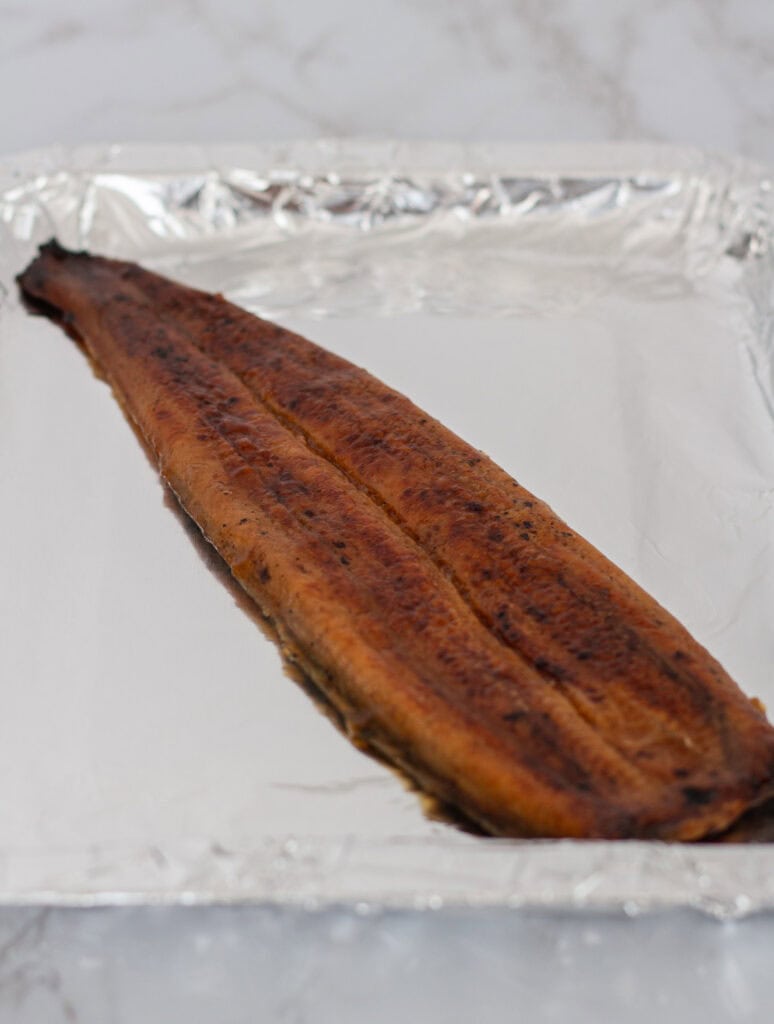
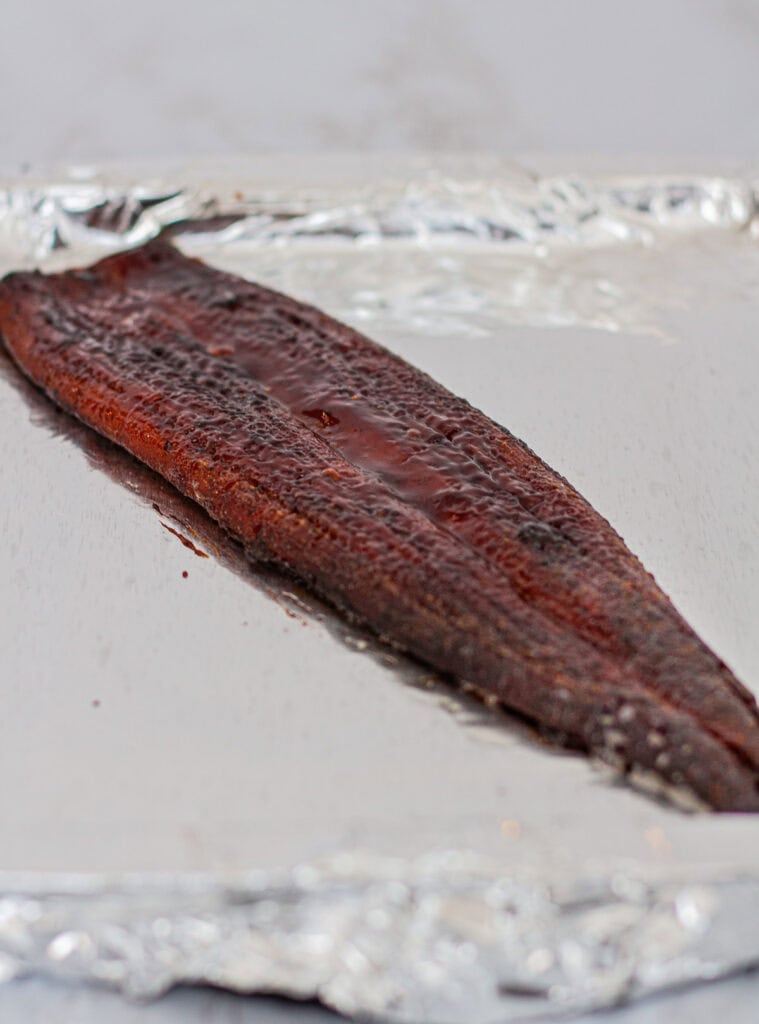
- Grilled unagi (freshwater eel) — I buy the frozen kind from the Asian market, usually found in the frozen seafood section. I thaw it overnight in the fridge and bake it with a little extra unagi sauce before using.
- Cucumber, julienned
- Avocado, thinly sliced
- Radish sprouts (optional)
- Unagi sauce — store-bought (I love the Kikkoman brand)
- Furikake (optional, for garnish)
- Bamboo sushi mat wrapped in plastic wrap, for rolling
Step-by-Step How to Make It
For a traditional unagi roll (maki), skip this step and keep the nori on the outside.
- Prep the fillings (warm the unagi)
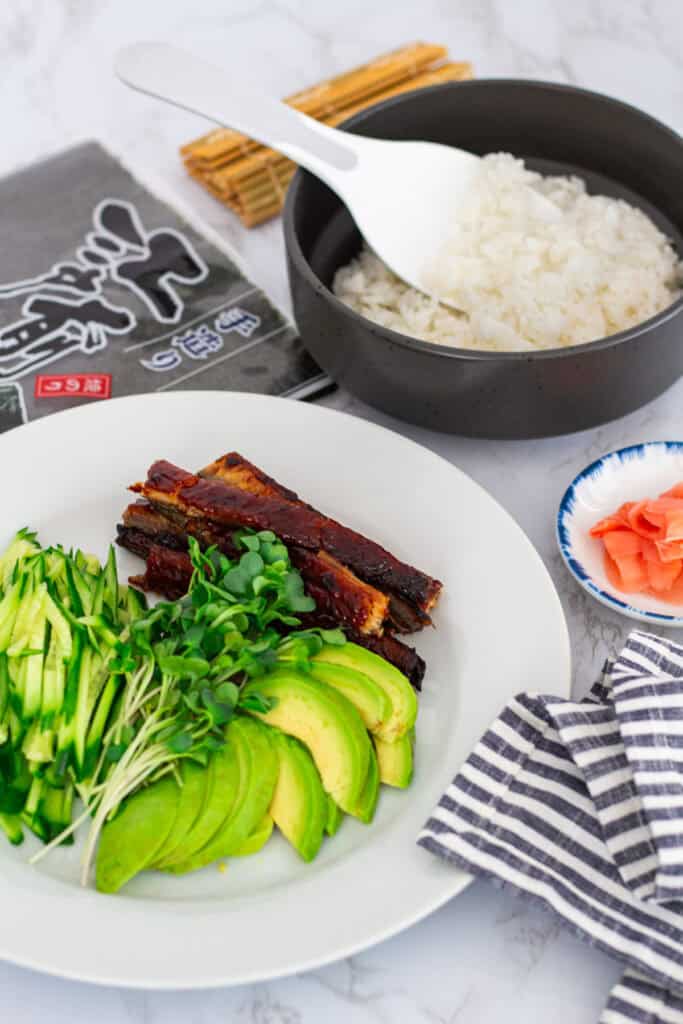
I use frozen grilled unagi. Thaw it overnight in the fridge. Bake it according to the package instructions. But I like to bake mine at 400°F for 8 minutes, then brush on extra unagi sauce and bake for 2 more minutes. I repeat this one more time for extra flavor and shine. Let it cool slightly so it’s easy to handle. While the unagi is baking, prepare the cucumber and slice the avocado. - Prepare your rolling station
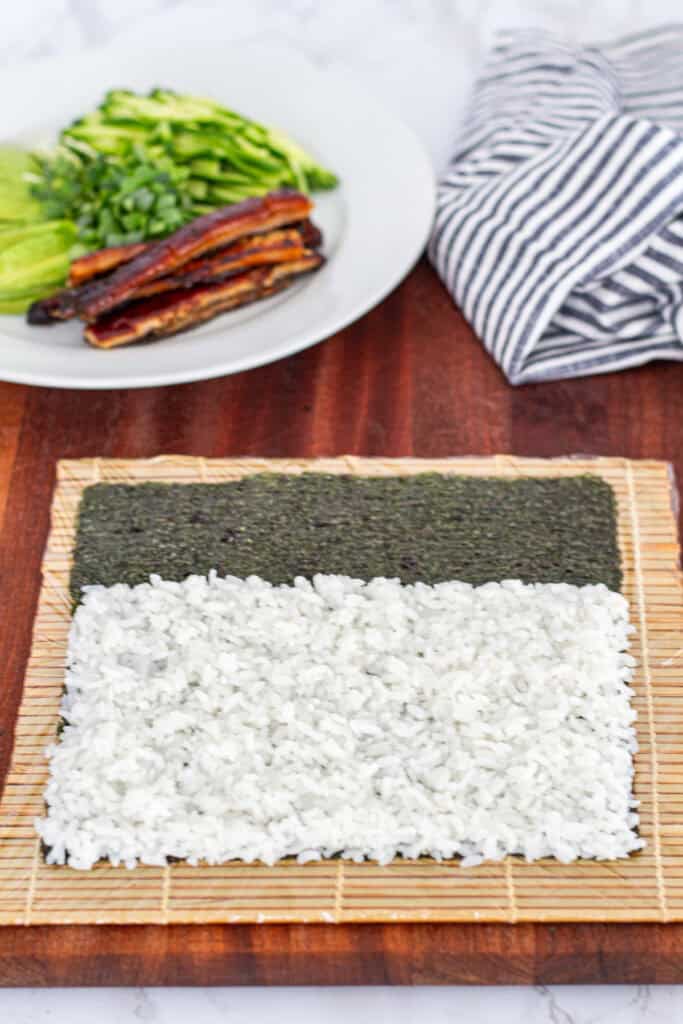
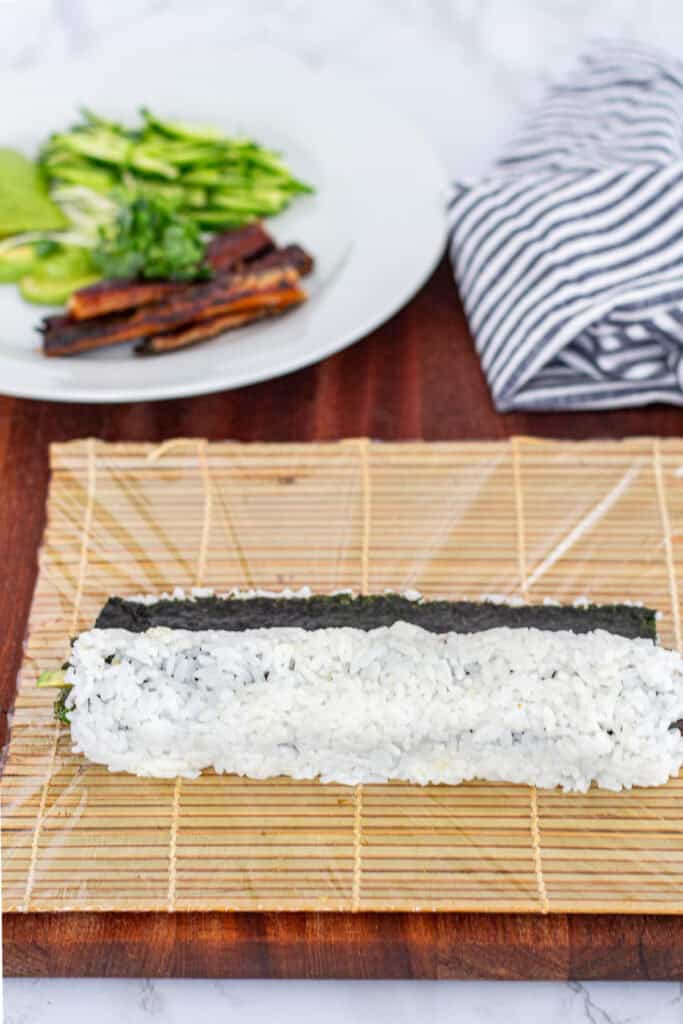
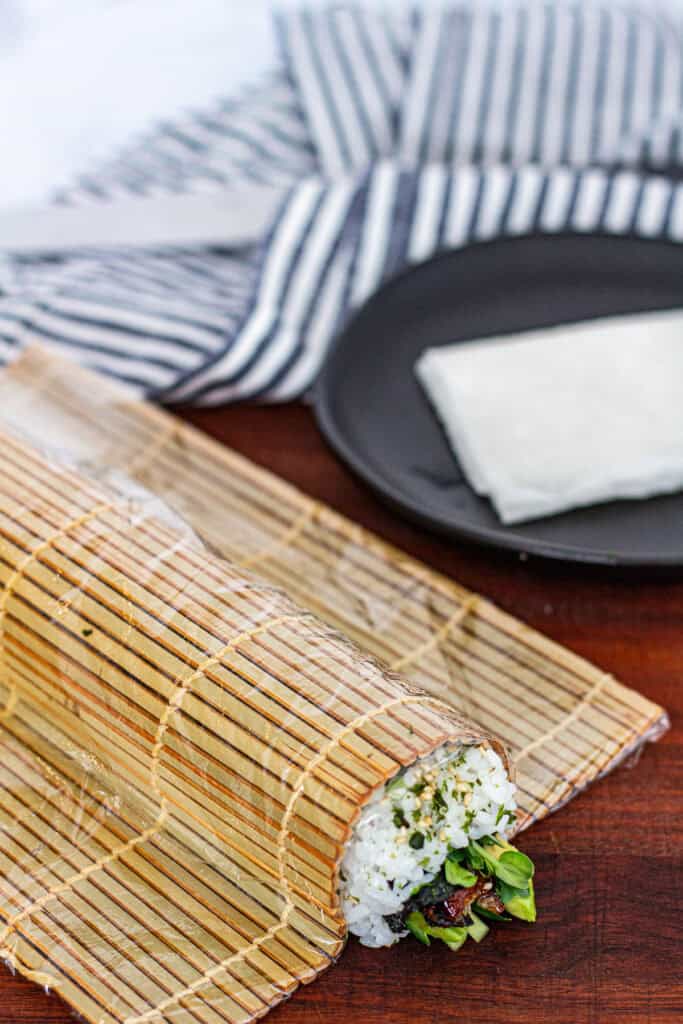
Place your bamboo sushi mat on the counter and wrap it in plastic wrap to keep it clean and prevent sticking. I like using disposable plastic gloves. But you can also just wet your fingers with water to keep the rice from sticking as you work. - Lay the nori and rice
Place a sheet of nori on the mat. Gently spread an even layer of seasoned sushi rice over about two-thirds of the nori. - Flip it over
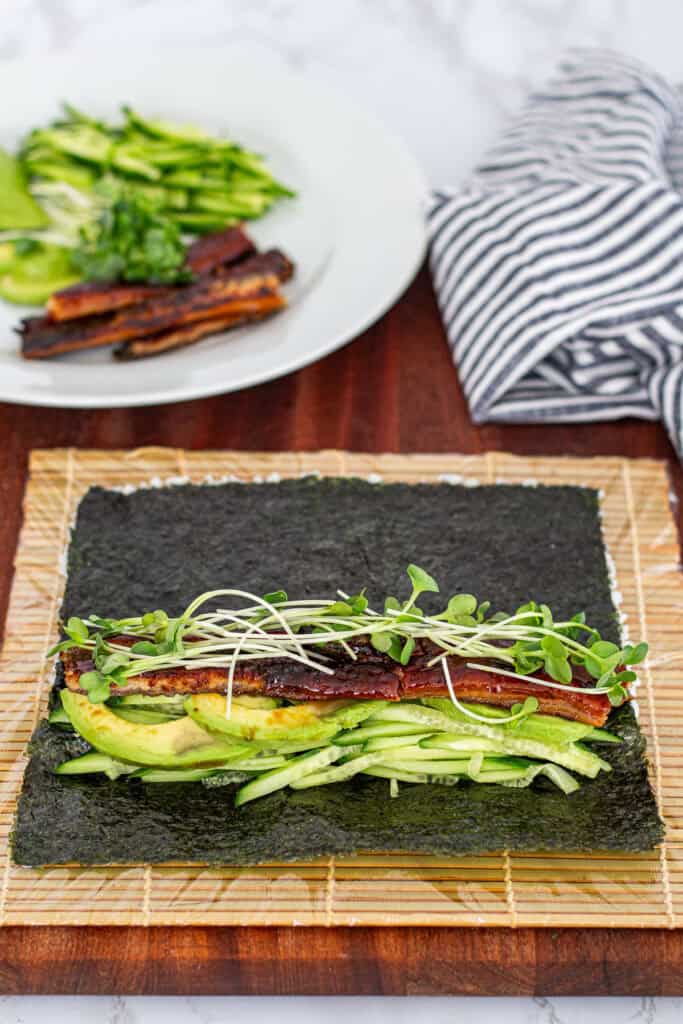
Carefully flip the nori so the rice side is down on the plastic wrap. This is what makes it an uramaki — with the rice on the outside! Make sure the bare strip of nori is closest to you; that’s where the fillings will go. - Add the fillings
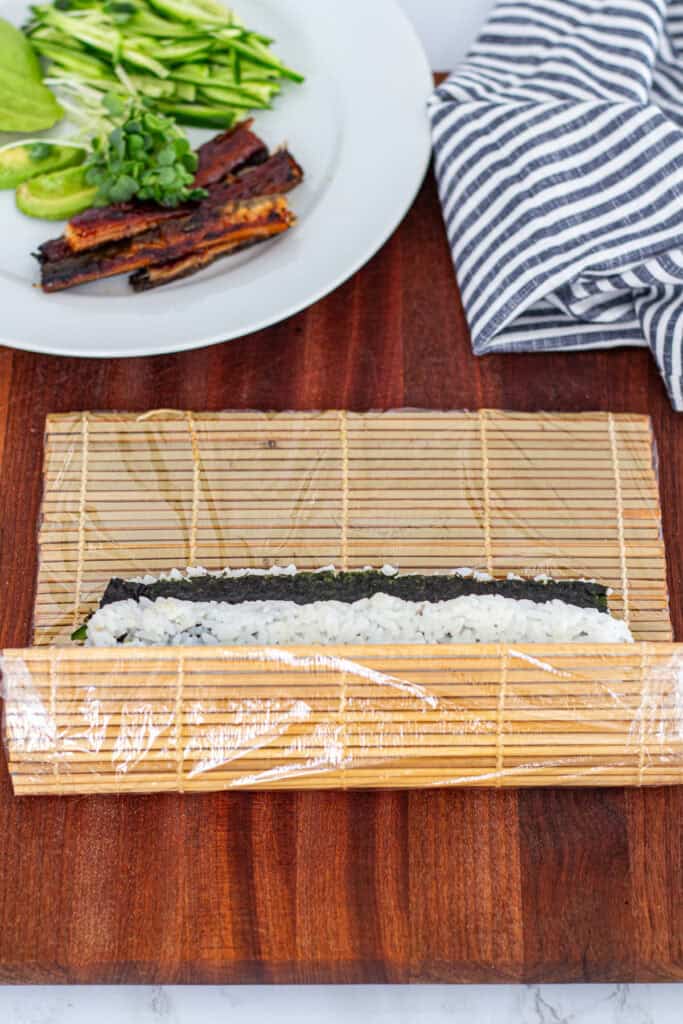
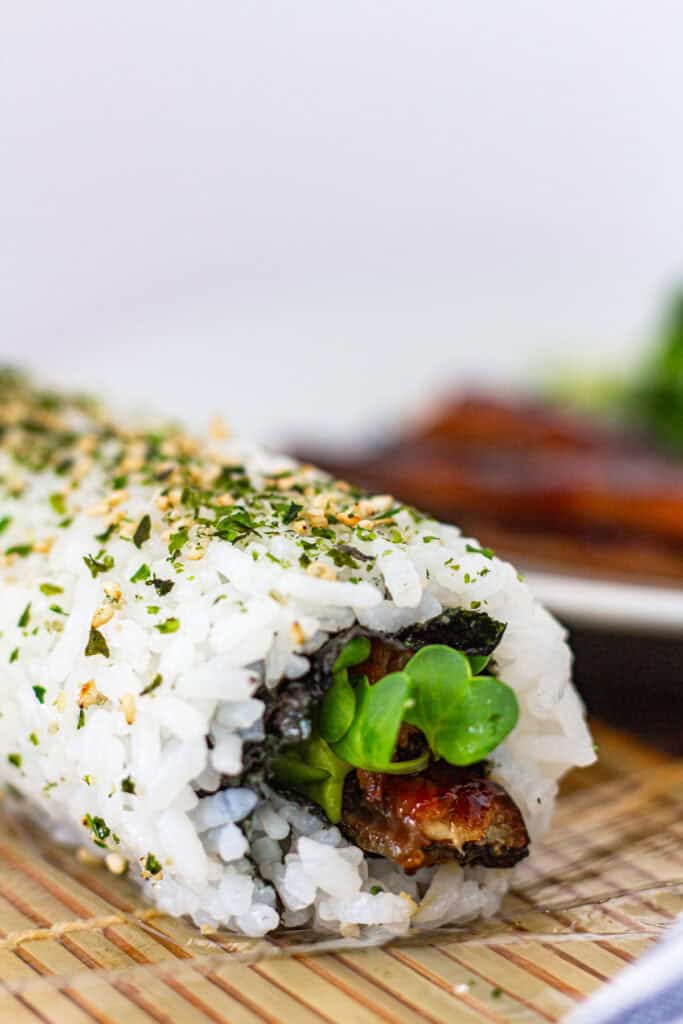
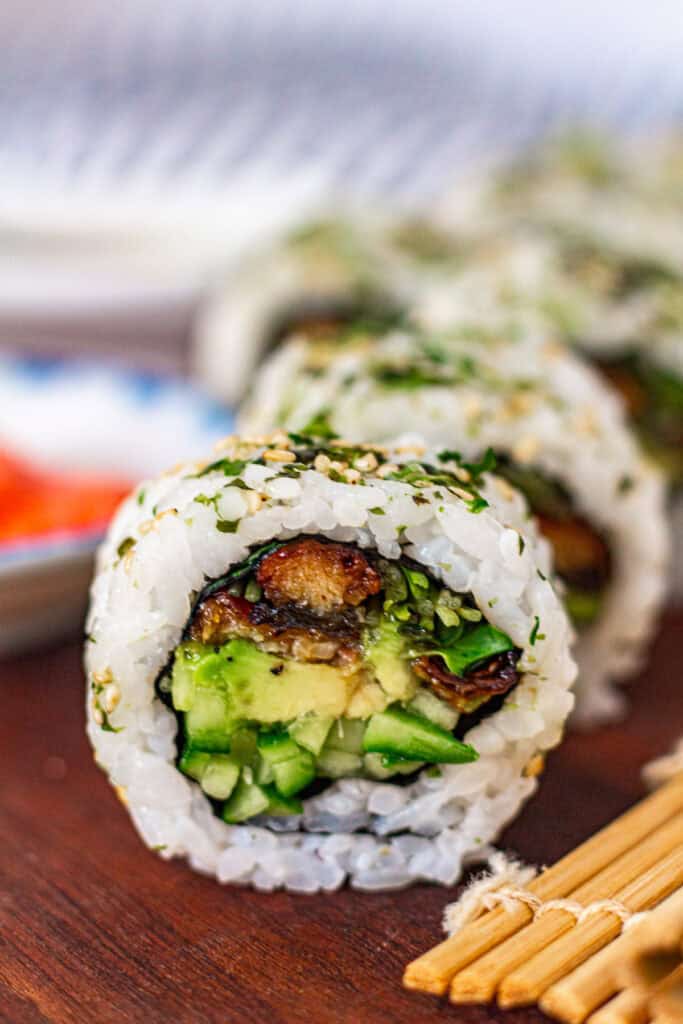
Along the bottom third of the nori (the side closest to you), lay a few strips of warm unagi, some julienned cucumber, and a few radish sprouts if you’re using them. - Roll it up
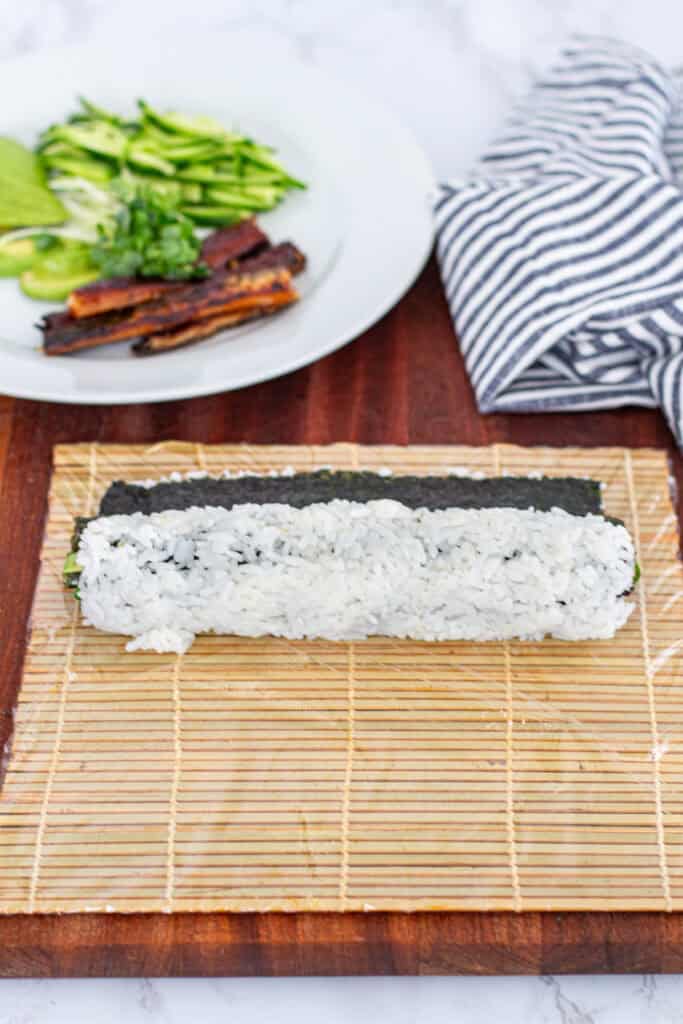
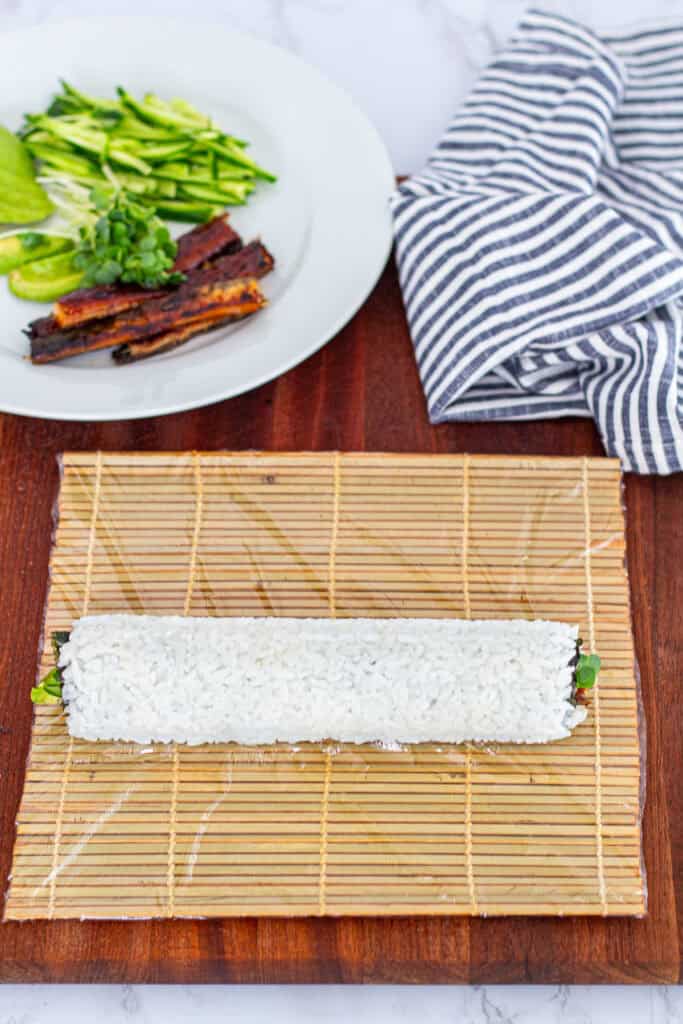
Using your thumbs and index fingers, lift the bottom edge of the nori and fold it over the filling, keeping it snug but not too tight. Once the nori covers the filling, pick up the roll and place it at the bottom of the mat, then continue rolling and shaping with the sushi mat until you have a neat log. - Slice and garnish
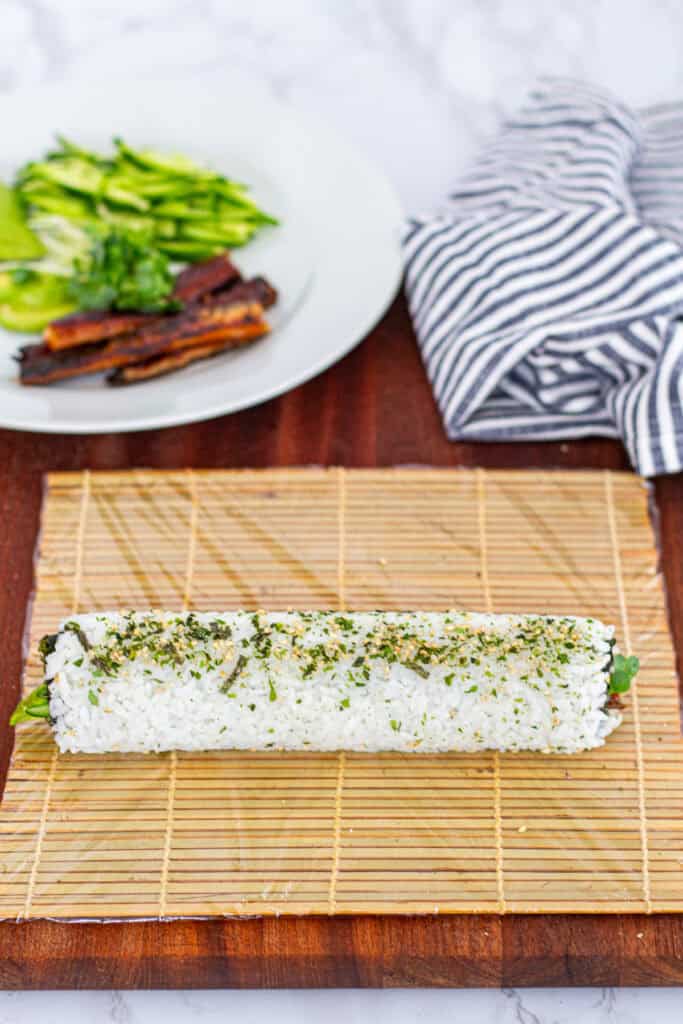
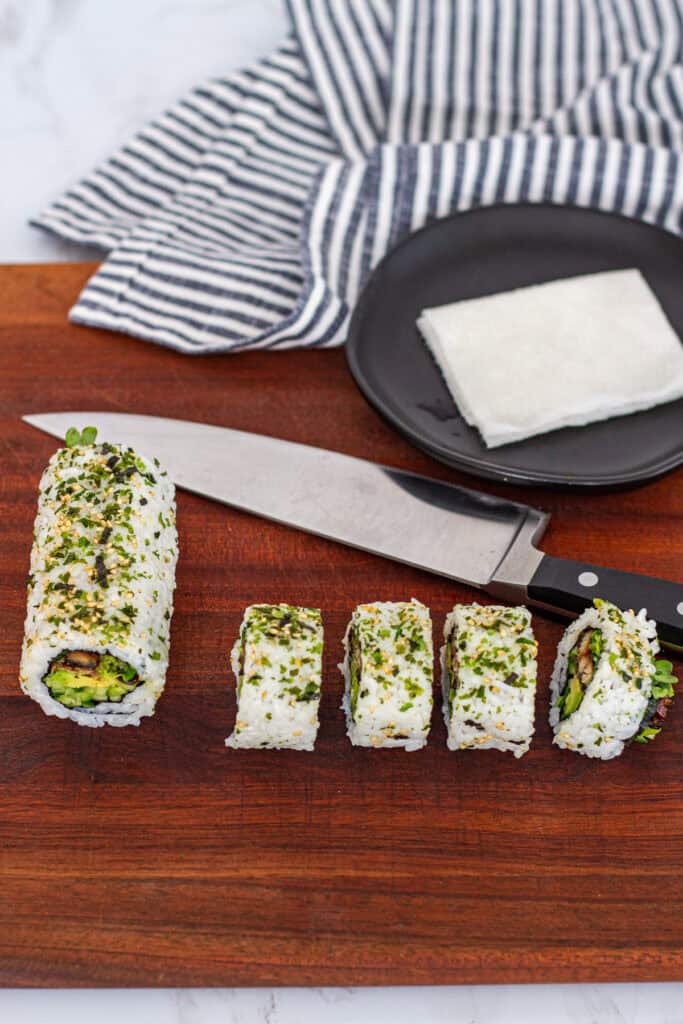
Sprinkle with furikake if you like. If you want to make a “green dragon roll,” this is where you’d lay the thinly sliced avocado on top of the roll before slicing. With a very sharp knife (wiping it clean between cuts), slice the roll into bite-sized pieces.

Customization & Variations
One of the best things about making sushi at home is how easy it is to customize! Once you feel confident with the basic technique, here are a few ways you can change up your unagi uramaki:
Filling Customization:
- Blanched asparagus
- Thinly sliced carrot or red bell pepper
- Shrimp tempura or crab meat
- Your favorite fish
Decoration Ideas: Drizzle with spicy mayo or extra unagi sauce, and sprinkle sesame seeds or furikake for a flavorful, fancy finish.
Pro Tips for Success
- Keep your hands clean:
Use a small bowl of water or wear disposable plastic gloves to keep rice from sticking to your fingers. - Spreading the rice:
When spreading rice on the nori, make sure to cover the bottom edge of the nori really well. If that area isn’t covered, you’ll see the seam when you roll it up. But covering it completely makes the roll look seamless. - Use the right amount of rice:
I find about 1 cup of seasoned sushi rice gives the perfect rice-to-filling ratio for one roll. - Rolling:
Don’t feel discouraged if your first roll looks a little wonky - that’s normal! You can always reshape it with the sushi mat after rolling. - Slicing the roll:
Use a sharp knife and a gentle sawing motion instead of pressing down, which can squeeze out the fillings. Wipe your knife with a damp paper towel between cuts for clean slices. If the roll loses its shape after cutting, don’t worry! Simply, place the mat over the pieces and gently shape them again, just like sushi chefs do at restaurants. - Practice makes perfect:
Uramaki can feel tricky at first, but each roll you make will get easier and prettier!
Questions about Unagi Roll (Unagi Maki)
I like to thaw frozen grilled unagi overnight in the fridge, then bake it at 400°F for about 8 minutes. After that, I brush on extra unagi sauce and bake for another 2 minutes and repeat once more extra gloss and flavor. Let it cool slightly before rolling so it’s easier to handle.
Don’t overfill your roll, and make sure the bottom edge of the nori is fully covered with rice - this helps it seal and look seamless. Use a bamboo mat wrapped in plastic wrap, and gently but firmly roll while shaping. Even if it looks wonky at first, you can reshape it with the mat after slicing.
No - unagi sauce (also called eel sauce) doesn’t actually contain eel! It’s a sweet, savory glaze made from soy sauce, mirin, and sugar. You can easily make it at home by simmering those ingredients together until thickened.
I don’t recommend making sushi ahead of time or storing it — it’s always best fresh. If you do have leftovers, wrap them tightly and refrigerate for no more than a day. Then letting them sit out a few minutes before eating so the rice softens.
As a rule, I make just enough for the meal since sushi doesn’t store well. I usually make 2–3 rolls for my husband and me. If I’m only making 2 rolls, I’ll also throw together a quick hand roll (temaki) or a simple maki (hosomaki) with classic miso soup to make it a more complete meal.
Making unagi roll at home might feel intimidating at first, but once you try it, you’ll see how approachable and rewarding it can be. If you’re new to sushi, start by reviewing how to make sushi rice so your rolls hold together beautifully.
For a cozy sushi night for two, serve these unagi rolls with a warm bowl of miso soup and maybe a simple side of edamame. If you want to expand the spread, add spicy tuna hand rolls or a classic maki roll to round out the table.
With a little practice, you'll be surprised how often you skip the sushi restaurant and create something just as special at home!
PrintHomemade Unagi Roll (Easy Unagi Maki Sushi)

Homemade unagi roll made with grilled eel, sushi rice, and nori. An easy, beginner-friendly unagi maki sushi recipe.
- Prep Time: 20 minutes
- Cook Time: 15 minutes
- Total Time: 35 minutes
- Yield: 2 rolls 1x
- Category: Main
- Method: Rolling
- Cuisine: Japanese
Ingredients
-
2 cups seasoned sushi rice, cooled to room temperature
-
2 roasted nori (seaweed) sheets
-
1 package grilled unagi (freshwater eel)
-
1 Persian cucumber, julienned
-
1 small avocado, sliced
-
1–2 oz radish sprouts (optional)
-
Unagi sauce
-
Furikake (optional, for garnish)
-
Bamboo sushi mat wrapped in plastic wrap
-
Soy sauce, wasabi, and pickled ginger (for serving)
Instructions
1. Prep the fillings:
Thaw frozen unagi overnight in the fridge, then bake at 400°F for 8 minutes. Brush with unagi sauce, bake 2 more minutes, and repeat if desired. Let cool slightly. While baking, julienne cucumber and slice avocado.
2. Set up your station:
Wrap a bamboo mat in plastic wrap. Wear gloves or keep fingers damp to prevent sticking.
3. Spread rice:
Lay nori on the mat, shiny side down. Spread rice evenly over two-thirds of the sheet.
4. Flip and fill:
Flip nori so rice faces down and bare edge is closest to you. Arrange unagi, cucumber, and sprouts along the bottom third.
5. Roll and shape:
Lift the bottom edge over the filling and roll snugly. Use the mat to shape into a tight log.
6. Slice and garnish:
Top with avocado if desired, sprinkle with furikake, and slice into pieces with a sharp knife, wiping it clean between cuts.
Notes
- Refer to the step-by-step photos above for visual guidance at each stage.
- Check the Pro Tips section for rolling, slicing, and shaping tricks.
- For perfectly seasoned rice, see my [Sushi Rice recipe]
- Learn more about ingredients and brands in my [Japanese Pantry Essentials post].
- If making multiple rolls, cover finished rolls with a damp towel to keep the rice from drying out before serving.


Ja says
Are you American because generally we just put water on our knife not oil.
George says
Hi Ja,
You can use water, but applying a very small amount of unflavored oil, such as vegetable oil, to the knife can be as effective. With oil, you won’t need to wet the knife as often as you would with water. However, using water is also a perfectly fine option.